
This post is intended for administrators who must deploy or manage the NSX Application Platform and activate the NSX applications that are hosted on the platform. This post will cover the deployment and activation starting from the NSX-T UI and it assumes the needed Kubernetes platform has already been prepared (Controller and Worker Nodes already created to meet the requirements as documented by VMware)
Overview
The NSX Application Platform is a modern microservices platform that hosts the following NSX features that collect, ingest, and correlate network traffic data in your NSX-T environment.
- VMware NSX® Intelligence™
- VMware NSX® Network Detection and Response™
- VMware NSX® Malware Prevention
- VMware NSX® Metrics
As network traffic data is produced, captured, and analyzed, the NSX Application Platform provides the platform that can be scaled out to meet the needs of these data-intensive features and the core services that support them.
Following is a list of some of the core services utilized by these NSX features. These services can be scaled out as the need arises.
- Messaging
- Analytics
- Data Storage
- Metrics
The NSX Application Platform is available beginning with NSX-T Data Center 3.2. After you meet the minimum system prerequisites and prepare for any existing analytics data that you want migrated from previous NSX Intelligence installation, you can deploy the platform using the NSX Manager user interface.
Refer to the below posts on the VMware documentation covering deployment prereq, licensing requirements and system requirements. I am assuming you have all these covered before trying to activate and deploy the NSX Application Platform from the NSX-T UI in this post.
NSX Application Platform Deployment Prerequisites
To install the NSX Application Platform successfully and to activate the NSX features that it hosts, you must prepare the deployment environment so that it meets the minimum required resources.[Read more]
License Requirement for NSX Application Platform Deployment
To deploy the NSX Application Platform, your NSX Manager session must be using a valid license during the NSX Application Platform deployment.[Read more]
NSX Application Platform System Requirements
The following table lists the form factors that the NSX Application Platform supports, along with the minimum resources required for each. The form factor you select determines which NSX features you can activate or install on the platform.[Read more]
NSX Application Platform Deployment Checklist
Use the checklist to track your progress with the NSX Application Platform deployment workflow and the activation of the NSX features that the platform hosts
Deploying the NSX Application Platform
My deployment leverages a Tanzu Kubernetes Cluster and the NSX-T native Load Balancer and all these have already been enabled and deployed prior to starting this deployment.
Let’s get started by clicking on System -> NSX Application Platform
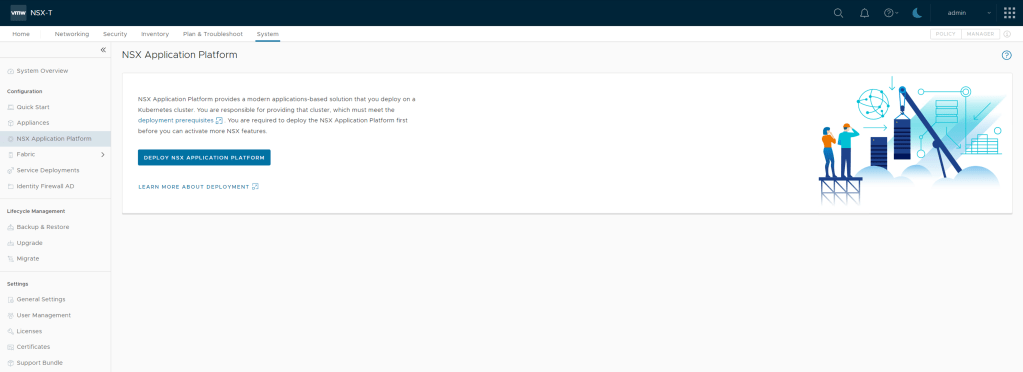
Step 1 – Prepare to Deploy
Start off by clicking “Deploy NSX Application Platform

Helm Repository – The repository from which you can obtain the packaged Helm chart for NSX Application Platform.
https://projects.registry.vmware.com/chartrepo/nsx_application_platform
Docker Registry – The registry URL from which you can obtain he Docker images for NSX Application Platform. Take note, there is not https:// in this URL
projects.registry.vmware.com/nsx_application_platform/clustering
These packages can be hosted on a private container registry or you can point to the VMware public repository – I am keeping it simple and pointing my deployment to the VMware public repository. This would mean your NSX-T Manager has Internet reachability.
If you are using a VMware Tanzu Kubernetes Cluster (TKC), do not use its embedded Harbor container registry for hosting the NSX Application Platform Helm charts and Docker images. Your infrastructure administrator must set up a separate Harbor container registry.

After populating the URLs, click SAVE URL.
If your NSX-T manager can reach these URLs it will list the Platform Target version and Chart Name shown below.

Click NEXT on the bottom right hand corner
Step 2 – Configuration details
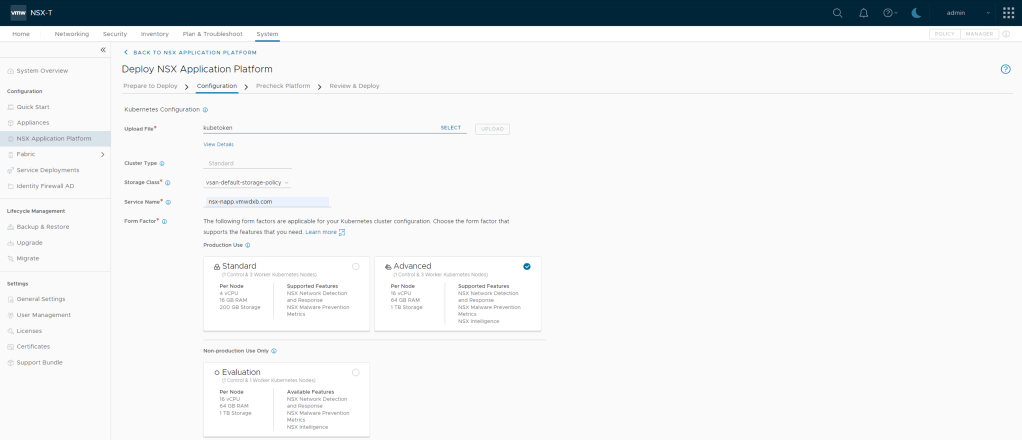
Kubernetes Configuration – Upload File
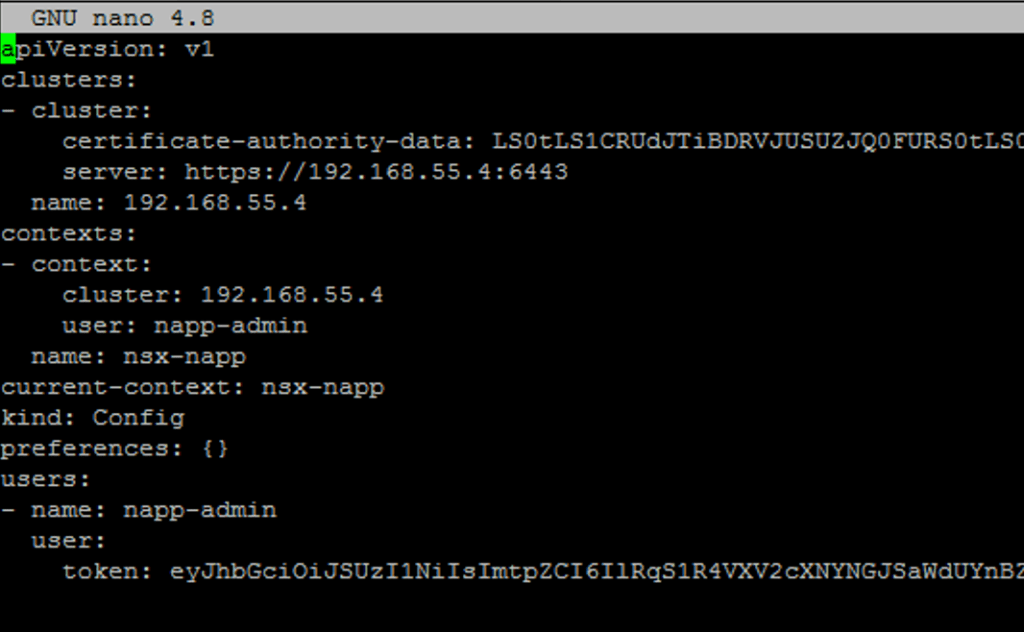
You need to create a kubeconfige file – all the steps are nicely documented here.
Select and browse to the file on your local machine and upload it to the NSX-T Manager
If you see the error message Server version and client version are incompatible, upload the latest Kubernetes Tools version to resolve the error, upload a compatible version of the Kubernetes tools bundle.
You can use the Kubernetes Tools bundle provided in the VMware Product Download site at https://customerconnect.vmware.com/downloads/details?downloadGroup=NSX-T-3201&productId=982&rPId=84354#product_downloads. When you download the file, the default name is kubernetes-tools-buildversion.tar.gz. For example, kubernetes-tools-1.20.11-00_3.5.4-1.tar.gz. Do not rename the file when you download it. The file is signed with a VMware private key.
- Either select Upload Local File or Upload Remote File.
- If you selected Upload Local File, click Select and navigate to the location of the Kubernetes Tools file.
- If you selected Upload Remote File, enter the URL from which the system can obtain the compatible Kubernetes Tools file. For example, enter the URL of the kubernetes-tools-buildversion.tar.gz file that you downloaded.
- Click Upload.
Storage Class – Storage Class values are provided by the kubeconfig file. To change available choices, please modify and resubmit the kubeconfig file.
Cluster Type – Standard is the only supported option today
Service Name – Enter a valid fully qualified domain name (FQDN) value for the Service Name text box.
The Service Name is used as the HTTPS endpoint to connect to the NSX Application Platform. The Service selector defines an abstract reference to multiple Kubernetes nodes. To change the available choices, please modify and resubmit the kubeconfig file.
This requires a FQDN created in DNS and reachable by the NSX-T Manager. This IP will be configured as ingress on the load balancer.
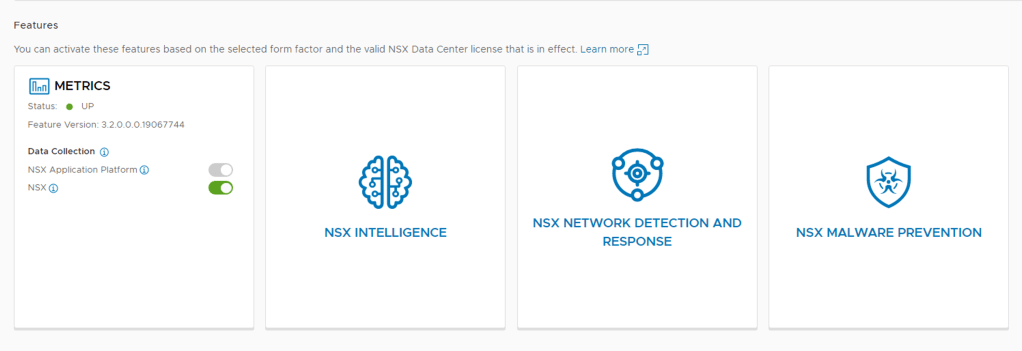
Form Factor – Lastly on this page you need to select the form factor which will be deployed. If you are planning to enable all the features hosted on the NAPP platform you will need to select the advanced form factor.
Standard Supports – NSX Network Detection and Response, NSX Malware Prevention and Metrics.
Advanced Supports – NSX Network Detection and Response, NSX Malware Prevention and Metrics and NSX Intelligence.
Once all the parameters are populated, click Next on the bottom right.
Step 3 – Pre Check the Platform
The system needs to check the configuration information that have been obtained before proceeding with the NSX Application Platform deployment.
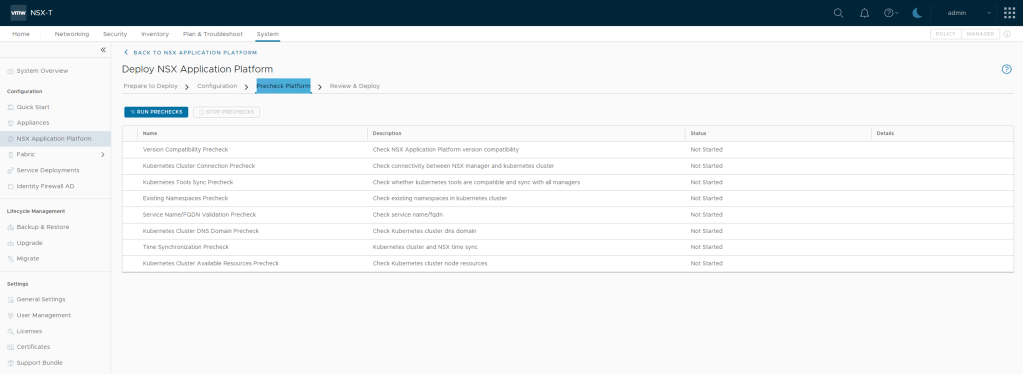
Click on Run PreChecks, the system will run the listed pre checks and should take a minute or so

All pre checks completed successfully with one warning “Kubernetes cluster and NSX time should be in sync.” This is just a note and not an error.
If you the system highlighted any other others you can view the details of these and address them as needed else Proceed and click Next on the bottom right.
Step 4 – Deploy NSX Application Platform
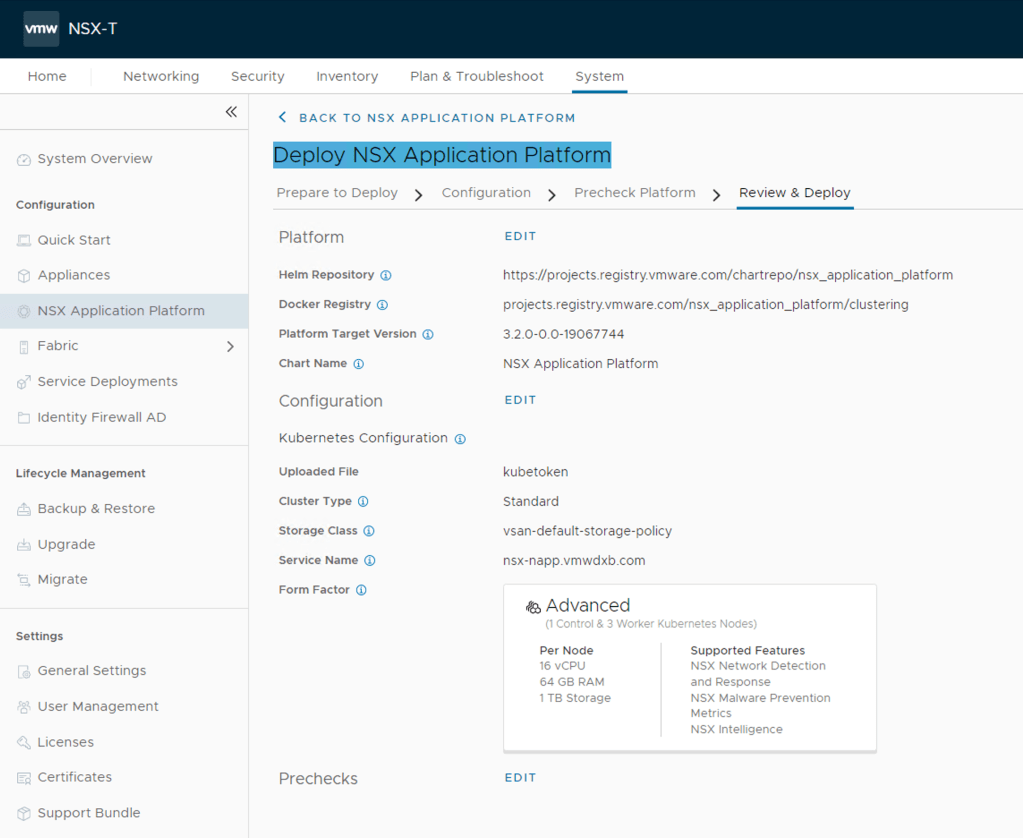
Review all the settings shown and if all the settings look correct proceed to Deploy the solution by clicking deploy at the bottom right.
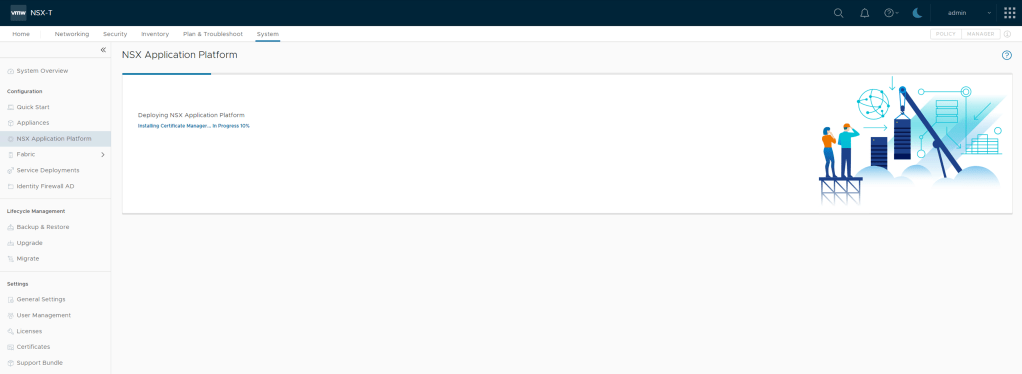
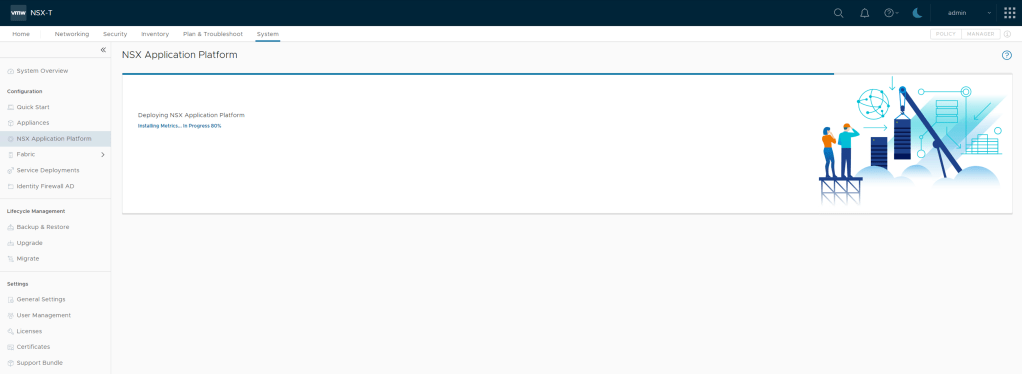
This will take some time depending on your environment but as the deployment is taking place, you can see the progress meter moving. I have come across a number of deployments hang at this point:
Installing Certificate Manager… In Progress 10%
At this stage I have not managed to figure out the main cause for this but instead I landed up recreating everything and it worked. If I do find any updated information on troubleshooting this I will share it here.


Results
Once the system successfully deployed the NSX Application Platform, the UI is updated with the details about the platform.

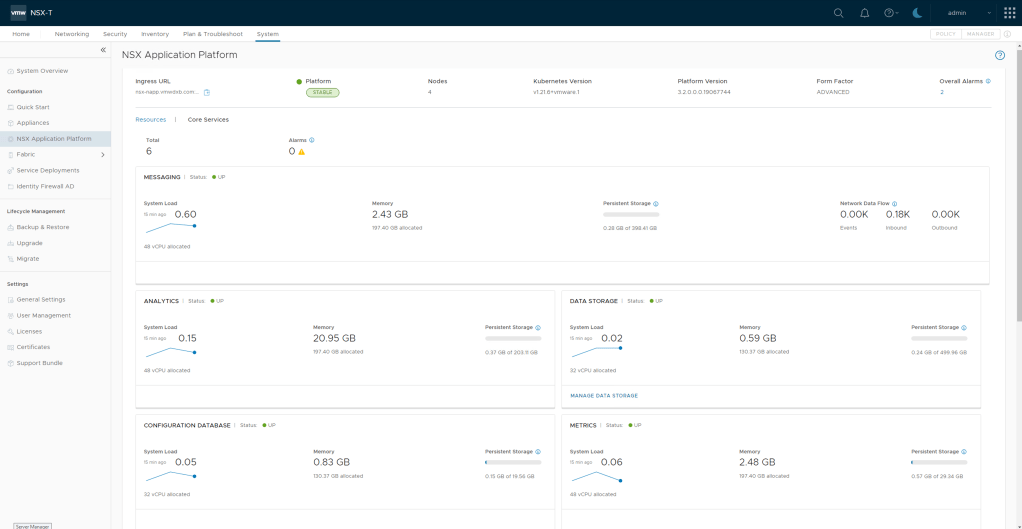
Once the NSX Application Platform has successfully deployed you can now continue with enabling the features listed at the bottom of the page – NSX Metrics is enabled with the deployment.
I will be doing follow-up posts enabling and consuming the various features.
Tanzu Deployment Screenshot for reference
Just some screen shots of my Tanzu deployment in vCenter


Hello,
I was trying to get the new kubefile generated using following VMware Document.
The below command is rejected the login.
kubectl vsphere login –server 10.10.30.2 -u administrator@vsphere.local –insecure-skip-tls-verify –tanzu-kubernetes-cluster-name Cluster1 –tanzu-kubernetes-cluster-namespace napp
–> 10.10.30.2 is my management cluster VIP
–> Cluster 1 is my Tanzu Cluster.
–> napp is my name space.
time=”2022-06-23T15:28:45+04:00″ level=warning msg=”Error occurred: could not find Tanzu Kubernetes cluster apiserver for Cluster1 in namespace napp”
time=”2022-06-23T15:28:45+04:00″ level=error msg=”Login failed: bad request”
time=”2022-06-23T15:28:45+04:00″ level=error msg=”Failed login to Tanzu Kubernetes cluster Cluster1: bad request”
LikeLike
This is the command that I was using from my jump server
kubectl vsphere login –server 192.168.55.2 -u administrator@vsphere.local –tanzu-kubernetes-cluster-name nsx-napp –tanzu-kubernetes-cluster-namespace napp-ns –insecure-skip-tls-verify
–> 192.168.55.2 is my management cluster VIP
–> napp-ns is the cluster name Tanzu
–> nsx-napp is my name space.
LikeLike