This post focuses on NSX Intelligence 3.2 when deployed on the NSX Application Platform in NSX-T 3.2. It does not cover migrating from previous versions of NSX Intelligence 1.X to 3.2 but instead looks at a greenfield installation.
NSX-T 3.2 introduced us to the NSX Application Platform (NAPP) and this replaces the need to deploy NSX Intelligence as a standalone appliance and simply enable the capability in the UI after deploying the NAPP platform.
NSX Intelligence 3.2 is available for ESXi-based hosts, physical server hosts, and ESX clusters that are enabled by the VMware vSphere® Lifecycle Manager.
The NSX Intelligence feature aggregates the network traffic flows in your NSX-T environment to provide deep traffic flow visibility, firewall policy recommendations, and suspicious traffic detection. To allow for scale-out capability, this feature is now hosted on the NSX Application Platform beginning with NSX Intelligence 3.2.
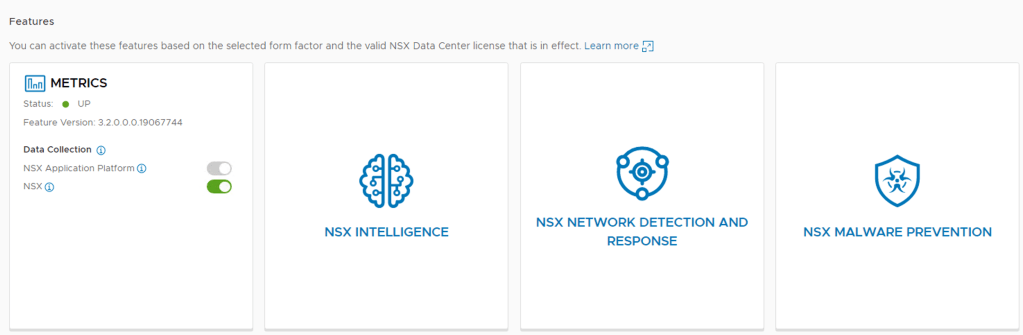
For a production environment, this feature requires that you select the Advanced form factor during the NSX Application Platform deployment.
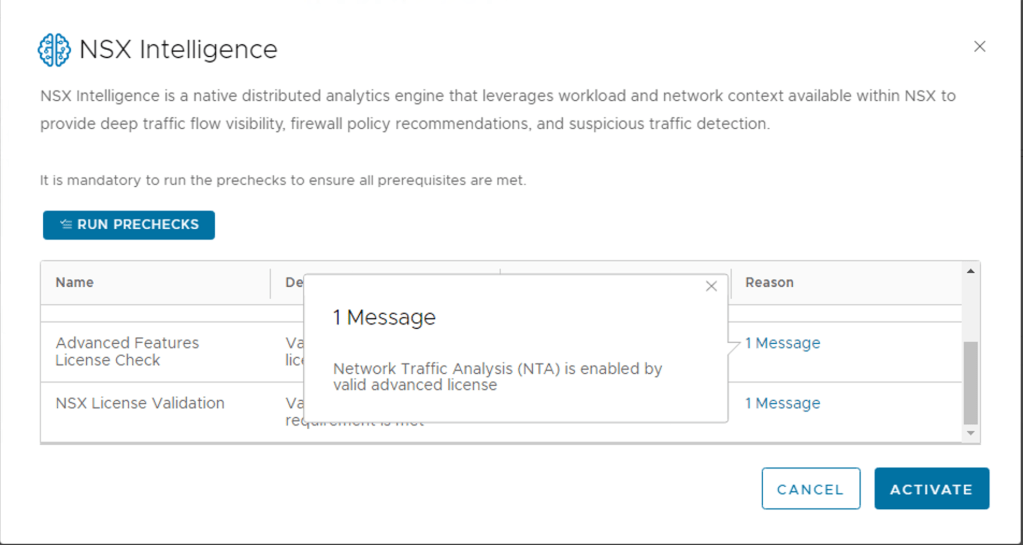
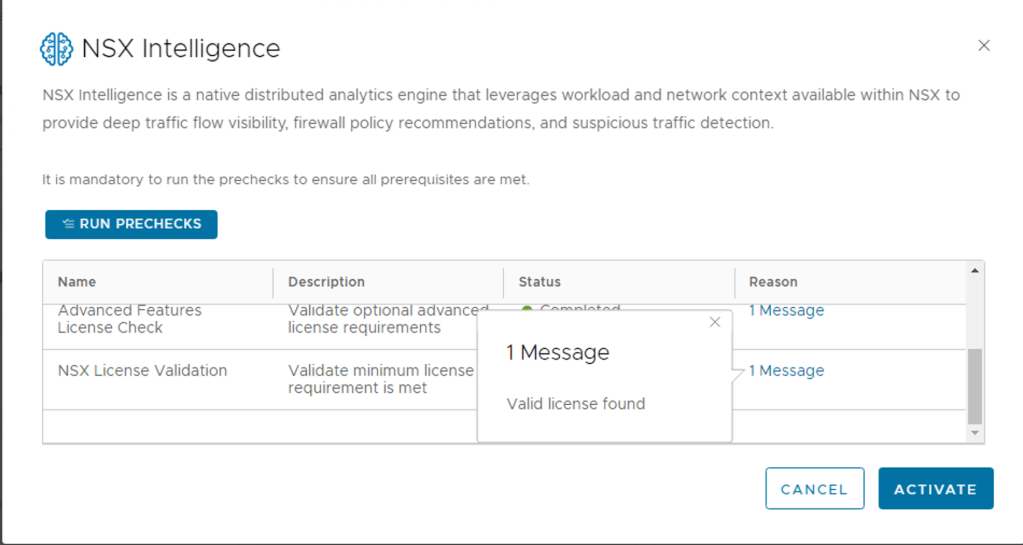
NOTE: NSX Intelligence activation requires the NSX Enterprise Plus license or one of the NSX Distributed Firewall licenses.
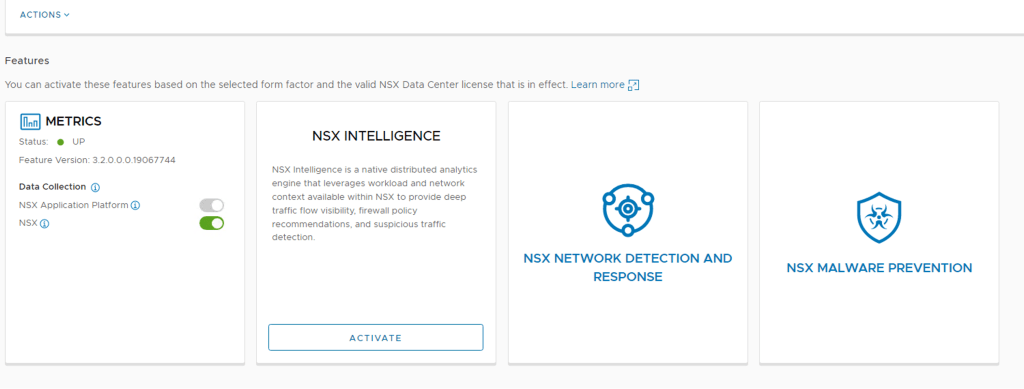
Activating VMware NSX Intelligence
Step 1 – In the NSX-T UI browse to System -> NSX Application Platform

Step 2 – Next, Select NSX Intelligence and click Activate
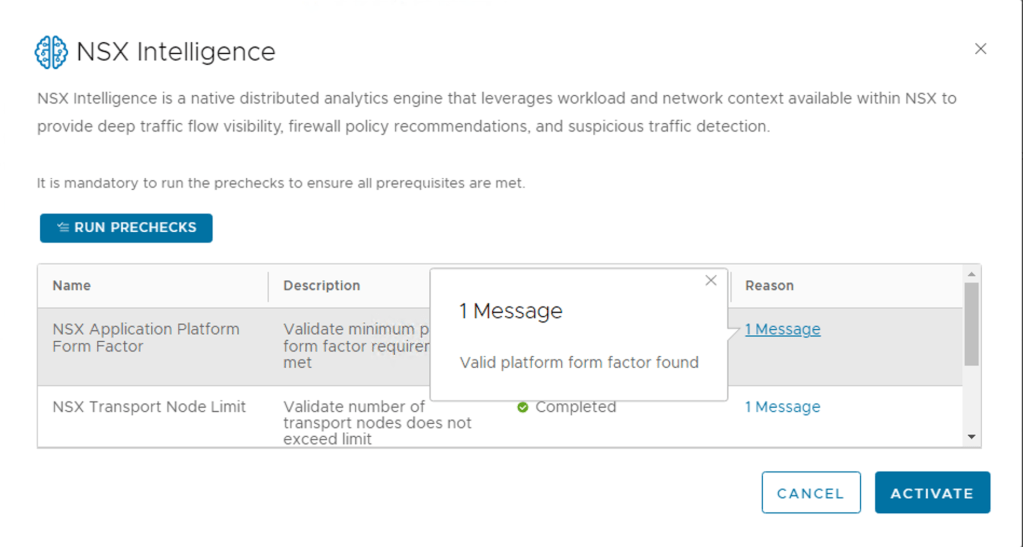
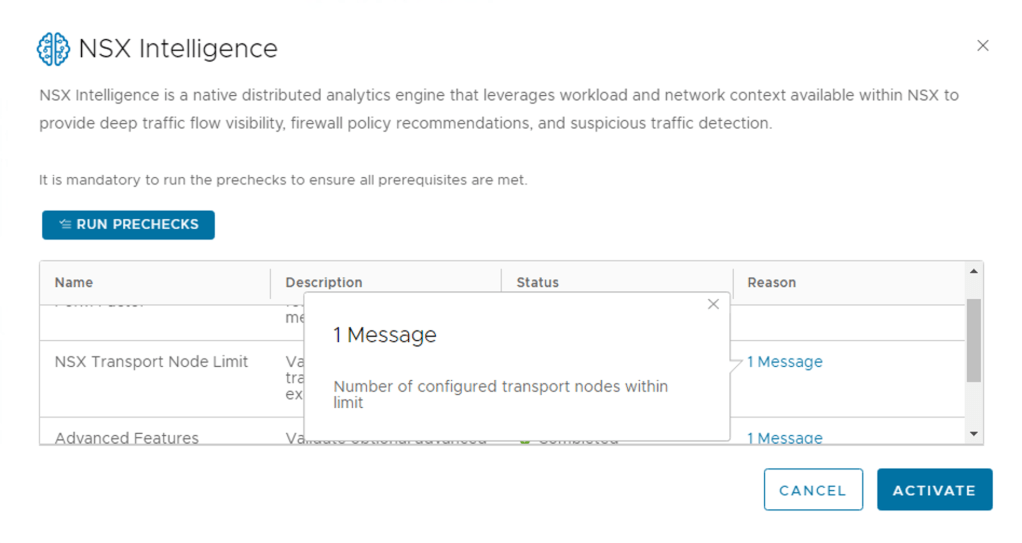
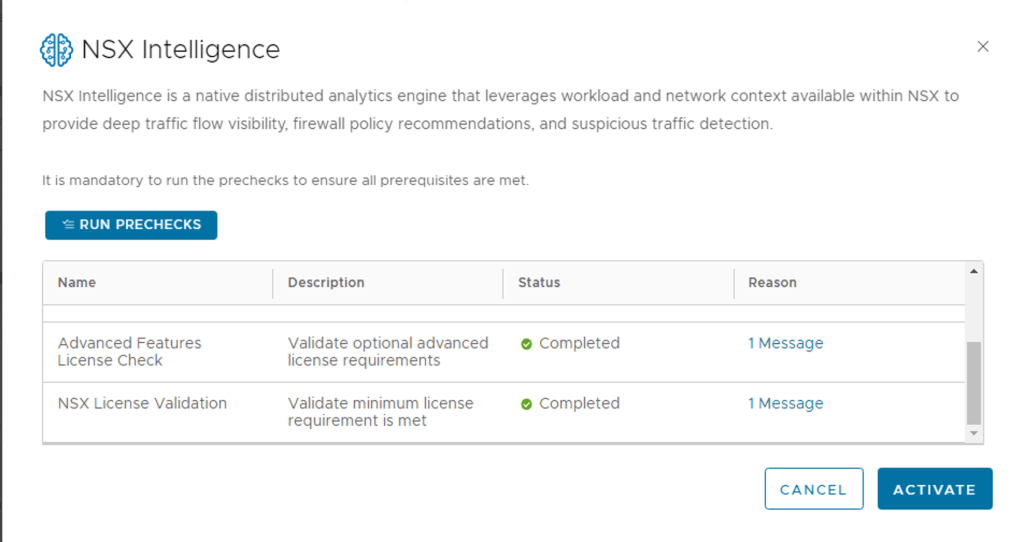
Step 3 – Run the PRECHECKS. This take a minute or so depending on your environment
One of the new features introduced with NSX Intelligence is Network Traffic Analysis, I will be posting some details and examples of enabling this feature in the future.
Step 4 – Once all pre checks are cleared, click activate
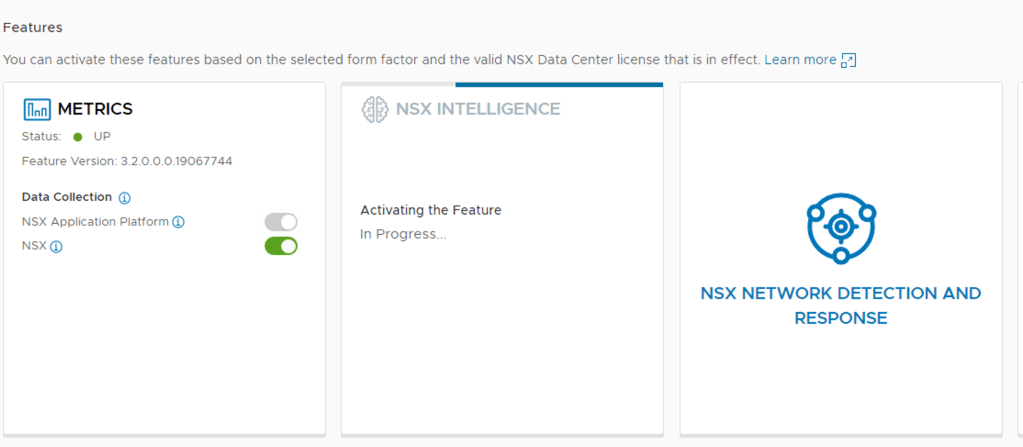
Once you selected Activate, you can monitor the process. This will take some time to complete.
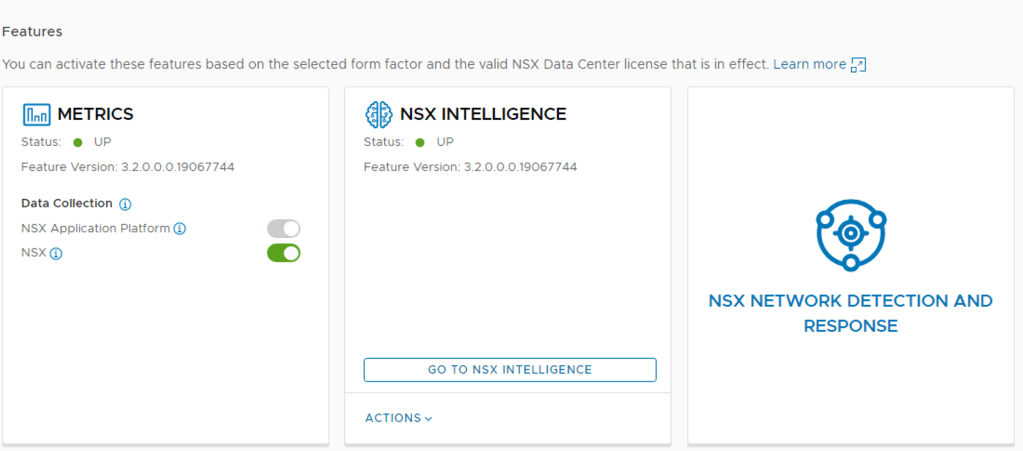
Step 6 – Click on “Go To NSX Intelligence”

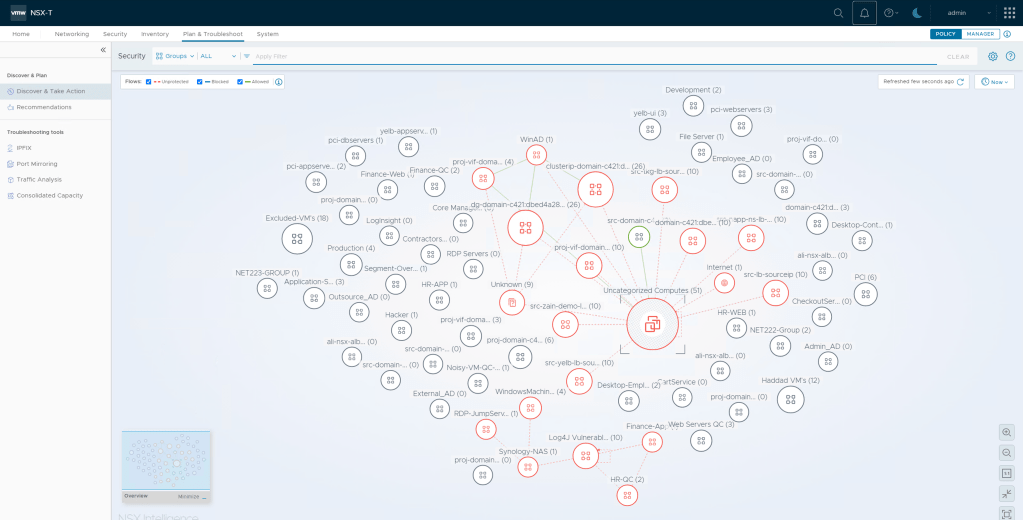
Step 7 – Click Refresh to View – you will start seeing your workloads and some flows
Step 7 – By default, after NSX Intelligence is activated, it starts collecting network traffic data on all standalone hosts and cluster of hosts in your NSX-T environment. You can optionally configure NSX Intelligence to deactivate traffic data collection for one or more standalone hosts or clusters of hosts.
Some default settings can adjusted by clicking on the gear icon on the top right

Out the box NSX Intelligence was enabled on all the vSphere cluster exposed to the NSX Manager, you can change the default selection using the toggle on collection status
System -> NSX Intelligence
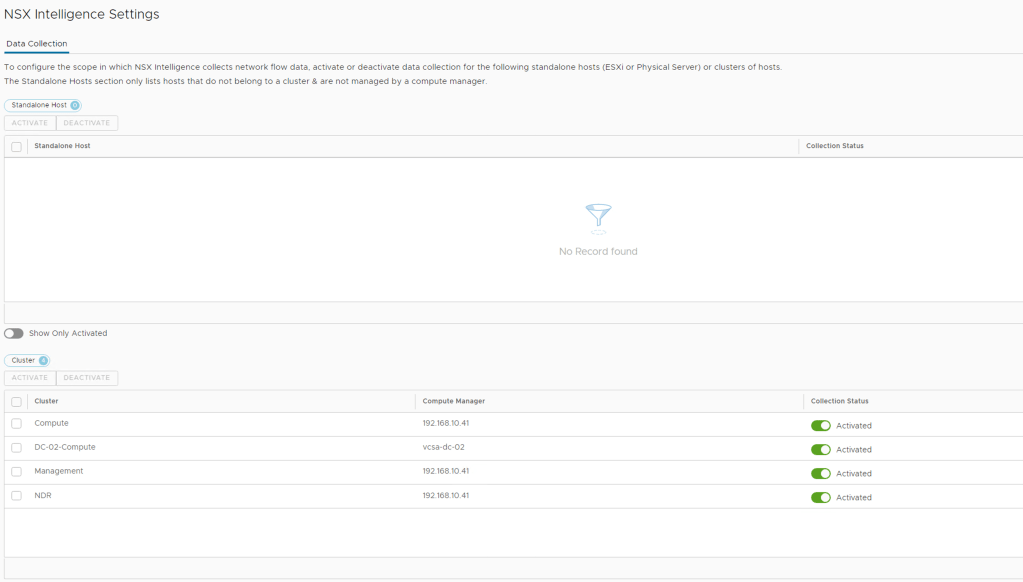
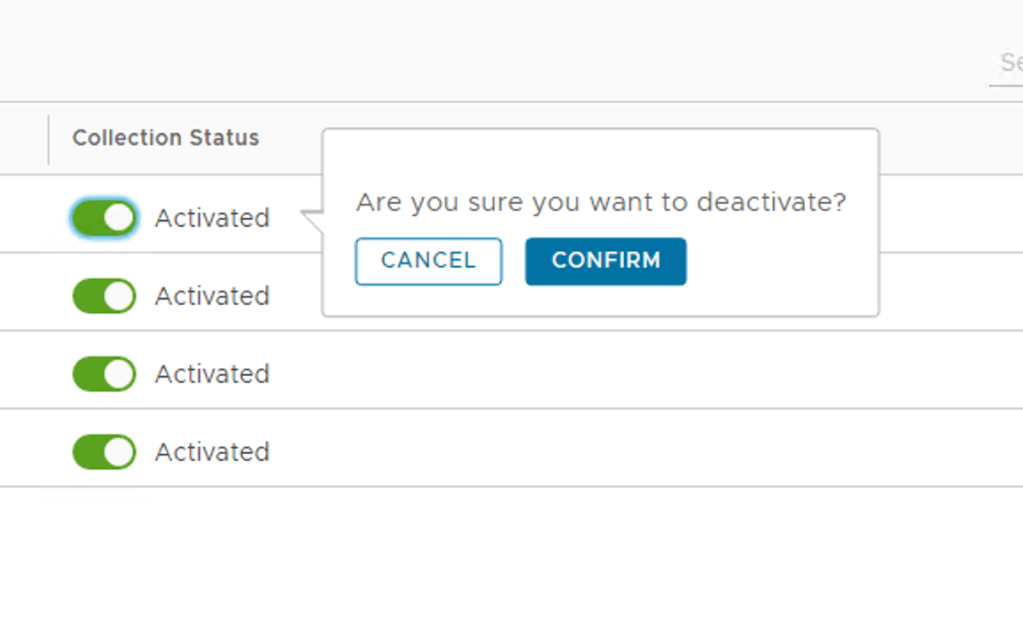
After removing the clusters that I did not want NSX Intelligence enabled this is my final view

Using NSX Intelligence
To start viewing the graphical visualization of your NSX-T workloads, navigate to Plan & Troubleshoot > Discover & Take Action and refresh the web browser you are using for the NSX Manager session

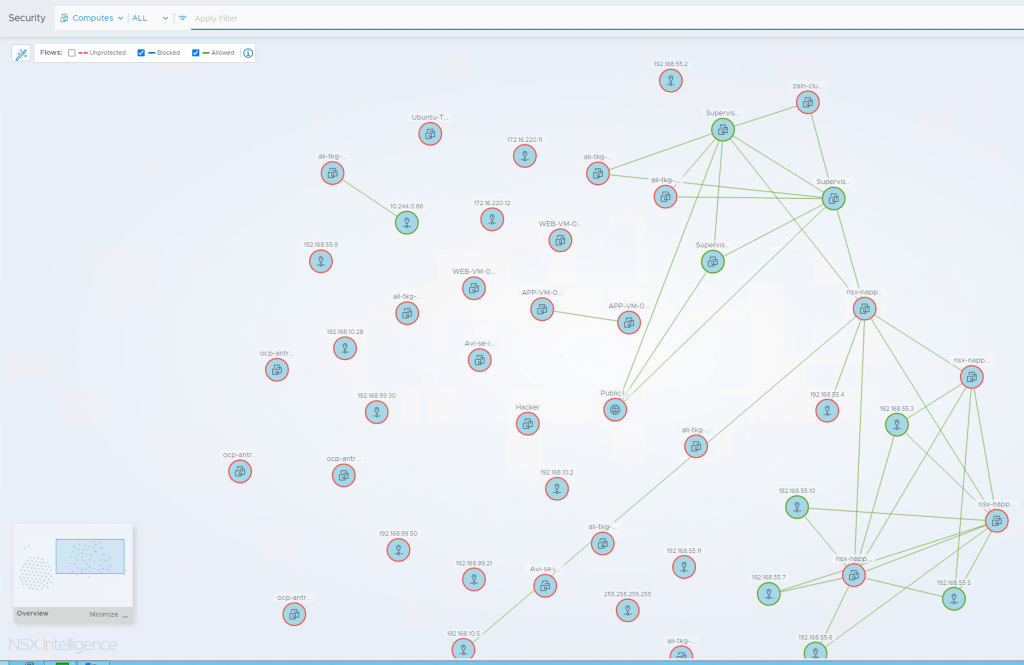
You can now change some of the default filters and how NSX Intelligence displays, selecting Groups or remove the tick box from specific flows.
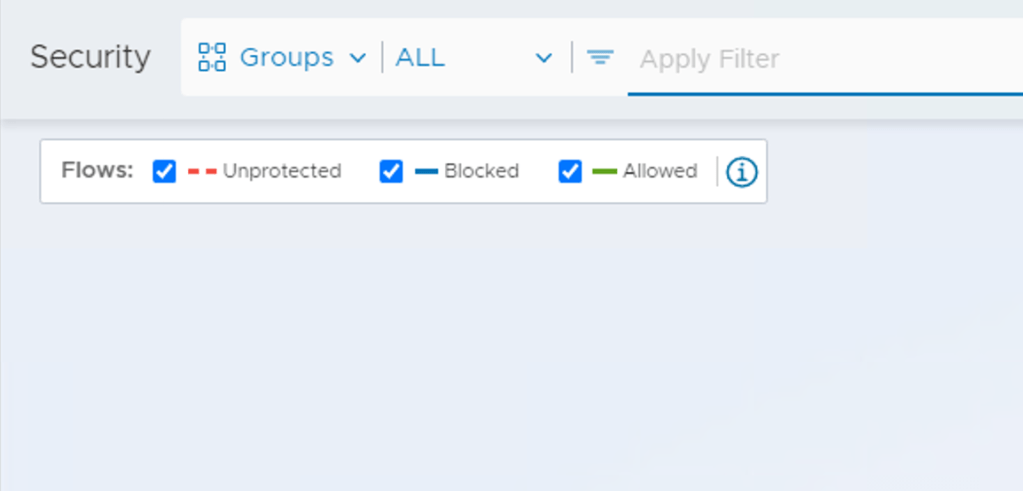
Some Sample Filter Outputs
Filtered to all Computers instead of Security Groups and removed all unprotected flows
Using NSX Intelligence Policy Recommendation
NSX Intelligence can be used to provide policy recommendation and push these recommendation to the NSX Distributed Firewall for policy enforcement.
Step 1 – Click Plan & Troubleshoot -> Recommendations
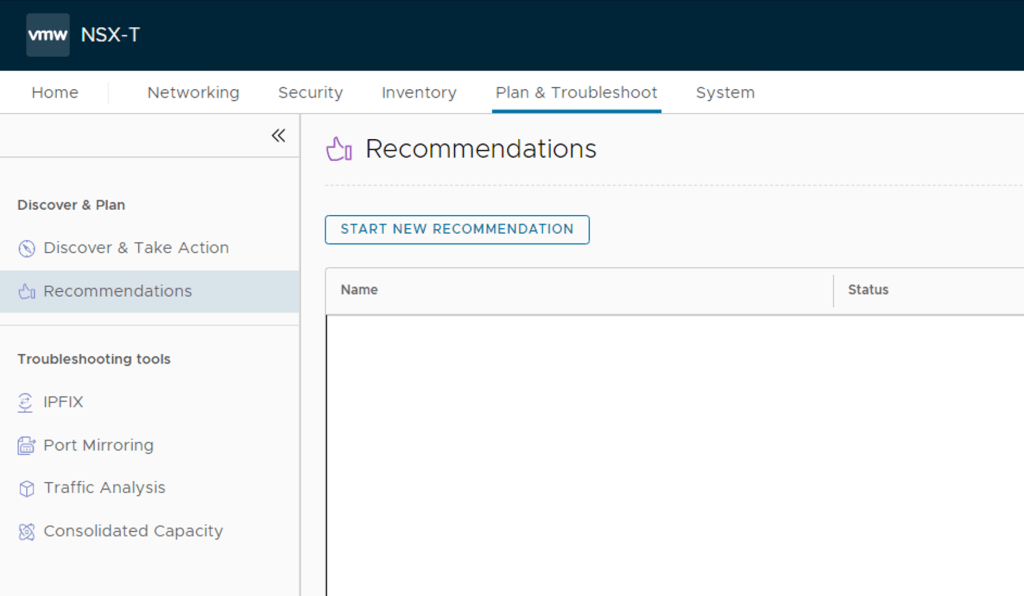
Step 2 – Click -> Start New Recommendation
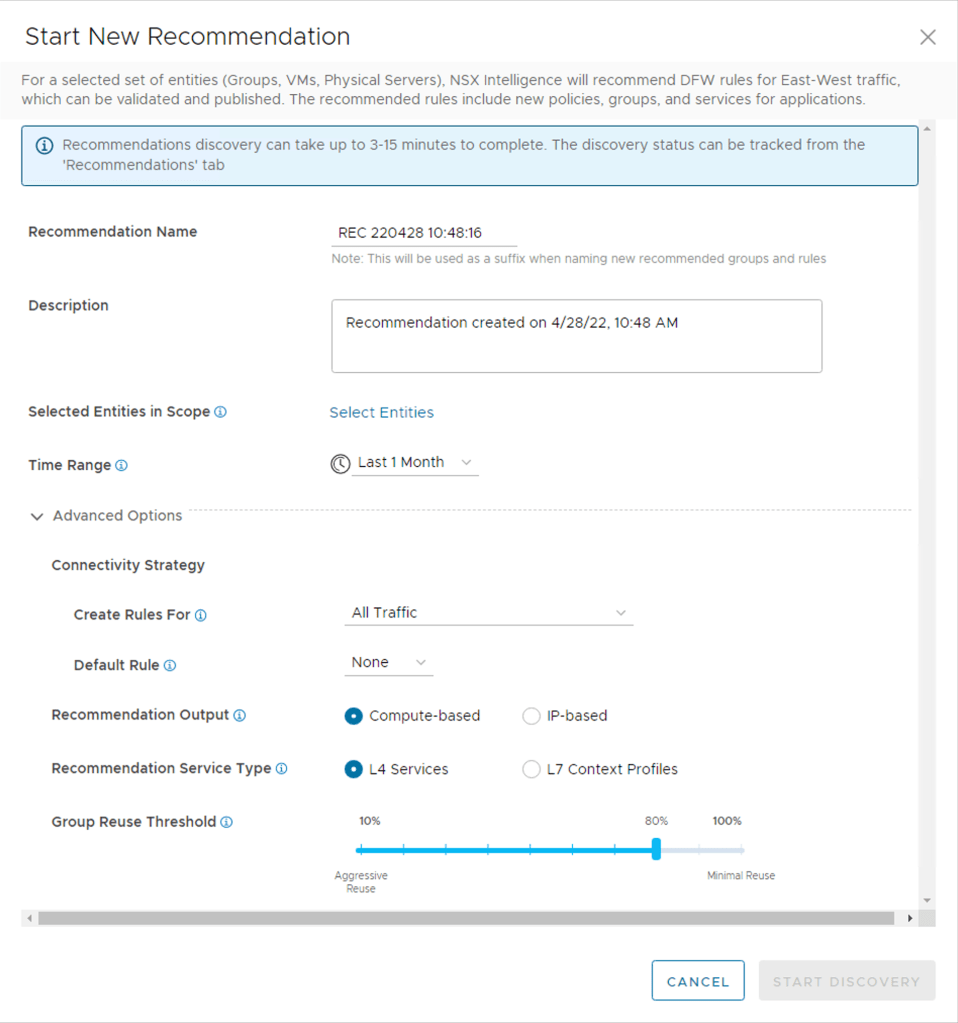
Step 3 – Recommendation Name: Provide a name for the recommendation – see the note below.
Note: This will be used as a suffix when naming new recommended groups and rules
Step 4 – Description: Provide a description as needed
Step 5 – Selected Entities in Scope: Selected the Security Groups or VM’s you want policy recommendations for.

I selected security groups related to a specific application and used the toggle at the bottom of the page to show only selected fields

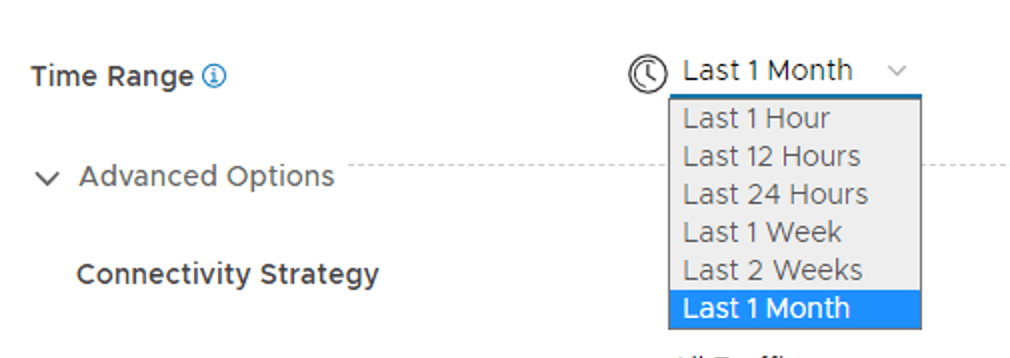
Step 6 – Time Range: The traffic data captured during this time range is used to create the NSX Intelligence recommendation. Default is set to 1 Month, but you can change this.
Step 7 – Advanced Options
There are some options which can be adjusted to improve the output of the recommended policies.
First Advanced Option – Connectivity Strategy, Create Rules For
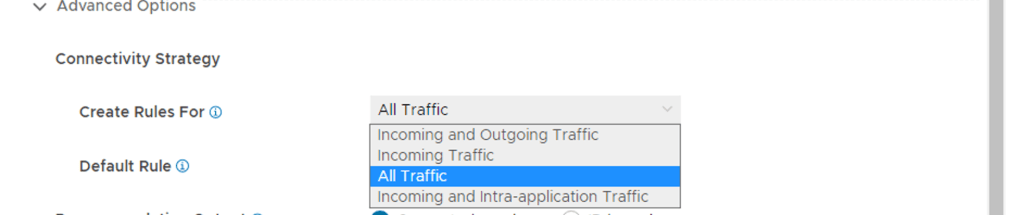
Select the traffic flows to consider in the recommendation analysis.
- All Traffic – Consider all traffic types: outbound, inbound, and intra-application
- Incoming and Outgoing – Considers traffic flows that originate from inside the application boundary to outside, and from outside the application boundary to inside of the boundary
- Incoming Traffic – Only consider traffic flows that originate outside of your application boundadry
- Incoming and Intra-application Traffic – Consider traffic flows that originate from outside of your application boundary and intra-application traffic
Second Advanced Option – Default Rule

Select a connectivity strategy to use to create the default rule for the security policy. An appropriate action is set on the rule based on the value of the connectivity strategy.
ALLOWLIST – Creates a default drop rule.
DENYLIST – Creates a default allow rule.
NONE – No default rule is created.
Third Advanced Option – Recommendation Output
Select between Compute Based or IP Based
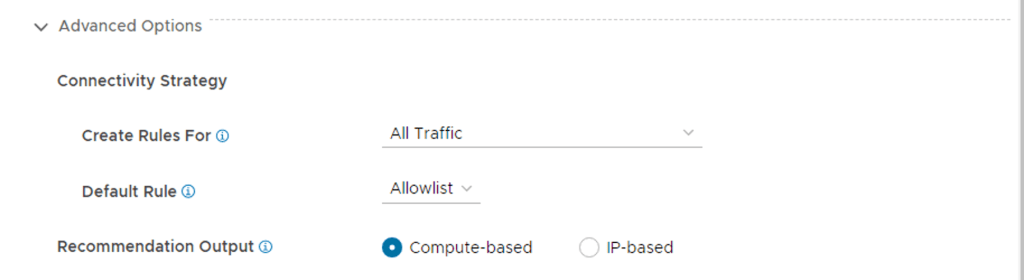
NSX Intelligence recommendations include Distributed Firewall (DFW) policies that consist of IPSet objects with a static list of IP addresses or groups that consist of constituent VMs, physical servers, or both.
Fourth Advanced Option – Recommendation Service Type
Select L4 Services or L7 Content Profiles
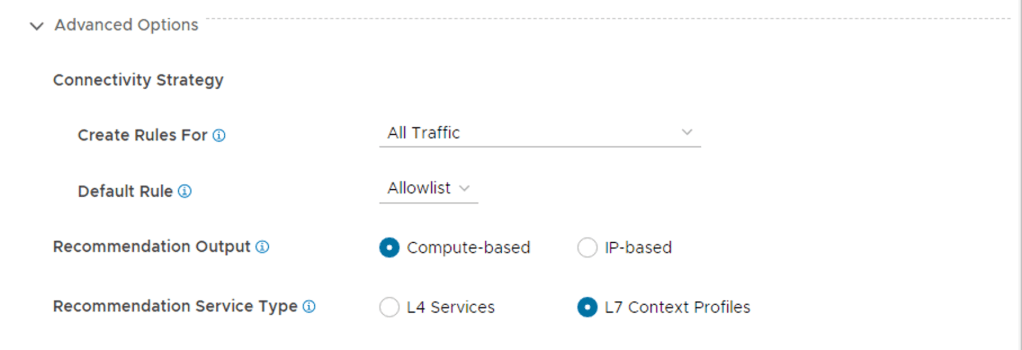
NSX Intelligence recommendations include Distributed Firewall (DFW) policies that consist of L4 services comprising of respective Port and Protocol or L7 Context Profiles.
Firth and Final advanced option – Group Reuse Threshold
This option allows for reusing security groups for common workloads with common network flows.
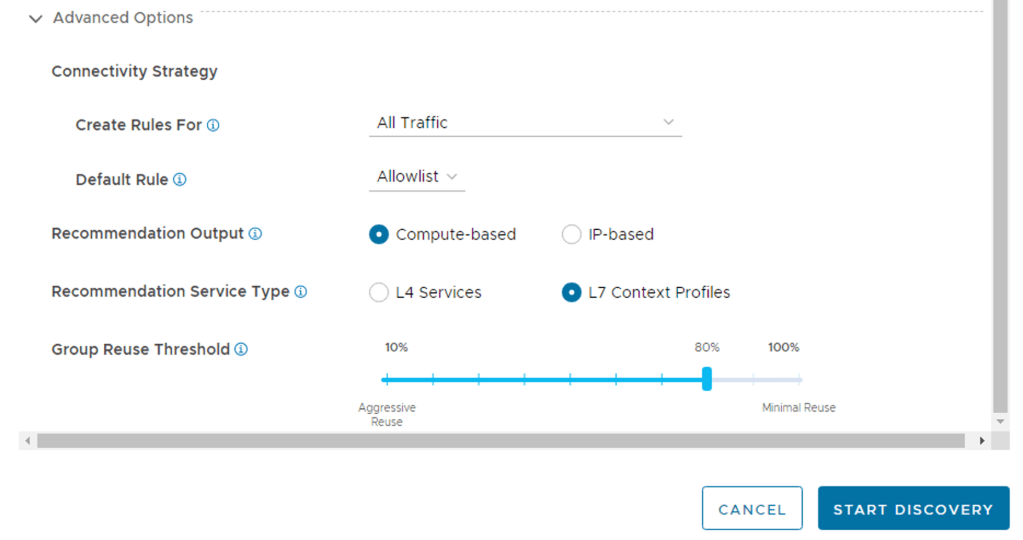
A threshold percentage between 10 and 100 which specifies how strictly groups are reused to cover the unmicrosegmented flows seen. Use this to control whether existing groups should be reused or new groups created when creating/modifying rules in a security policy.
Setting this value to 100 means that the members of the picked group have to be a subset of unmatched computes, which means 100% of group members match. This will result in creating more new groups however as existing groups are less likely to be reused in rules being added/modified.
Setting this to lower values like 10 or 20 means that even groups with extraneous members other than the computes we are seeking to group will be picked as additional rule sources or destinations. This will result in aggressive group reuse and hence less number of new groups to be recommended. However this also means that the rule src/dest is being expanded beyond the flows we have seen due to the extraneous members.
Final Step – Start Discovery
Click Start Discovery

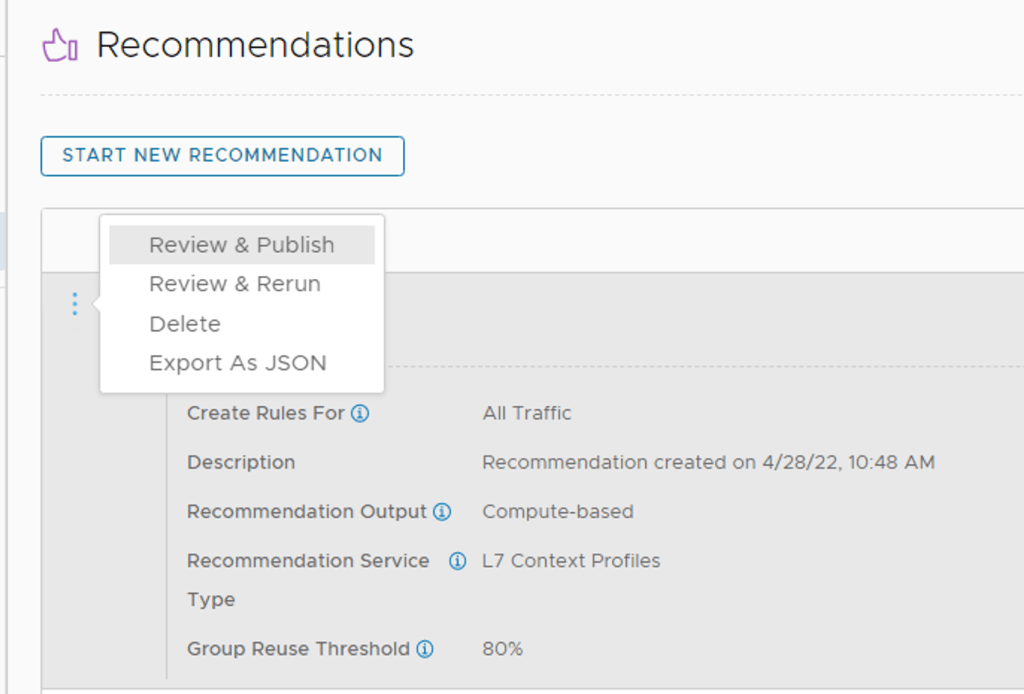
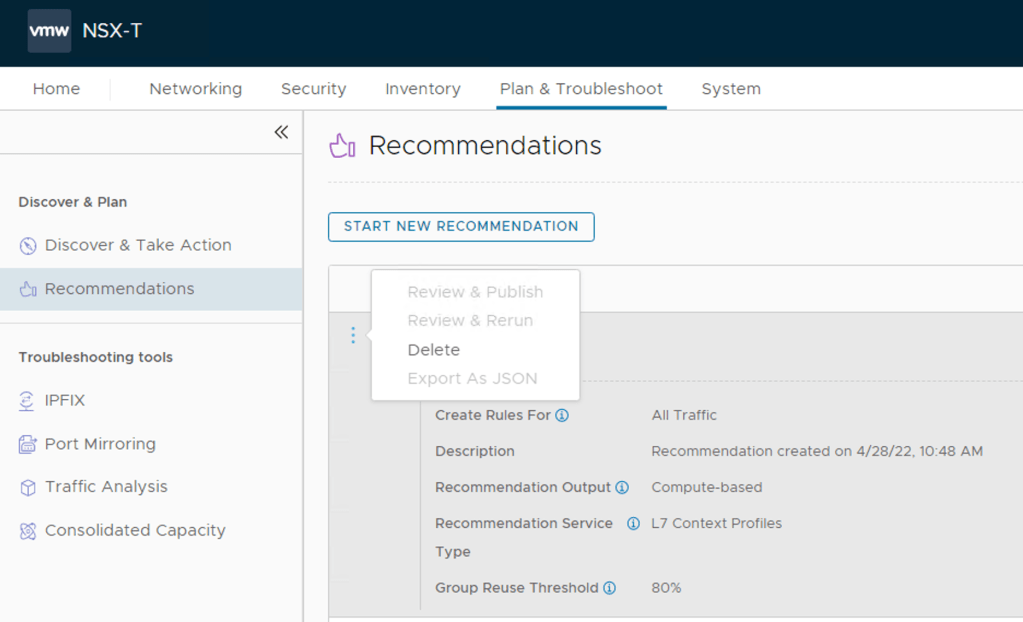
Once the recommendation process has started, the output can be monitored under recommendations

Once the recommendation has completed. Click on the grey arrow next to three dots and expand the output.

Click on the three blue dots and select Review & Publish to see the discovery and recommendations.

You can browse through the rules recommended and check the process rules. Group names can be edited, services added or removed.
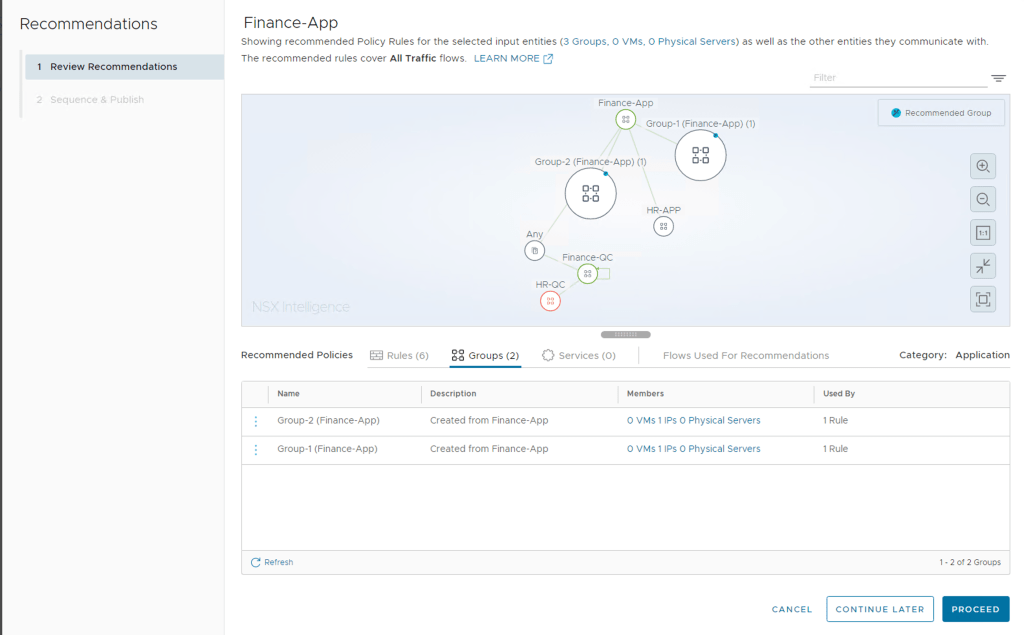
If all the recommended policies are acceptable or you have completed editing them you can click on Proceed
Finale Review before Publishing
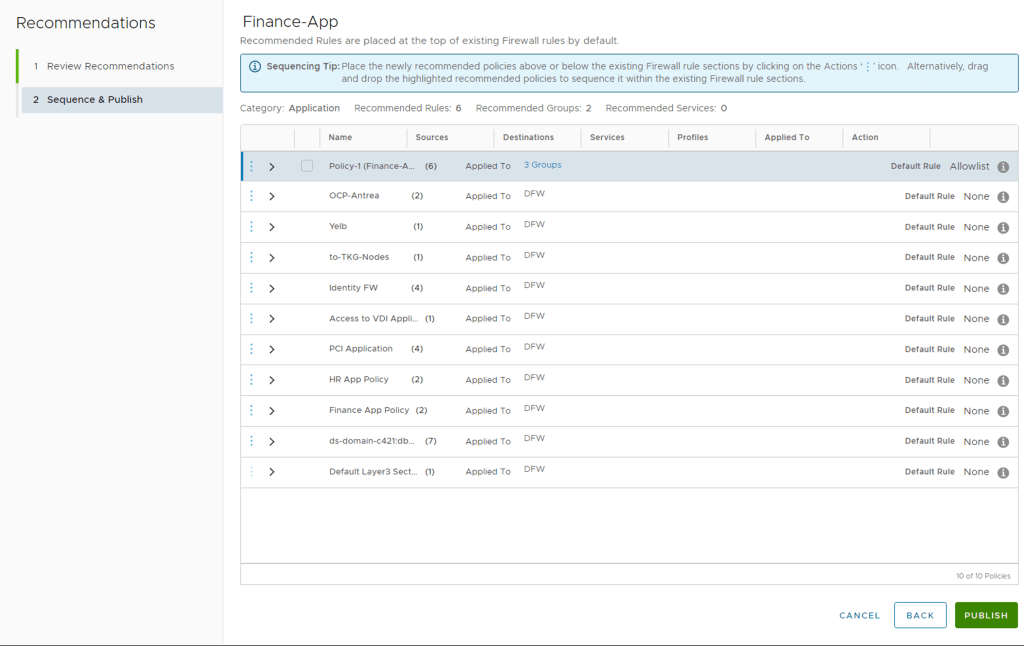
Place the newly recommended policies above or below the existing Firewall rule sections by clicking on the Actions ‘’ icon. Alternatively, drag and drop the highlighted recommended policies to sequence it within the existing Firewall rule sections.
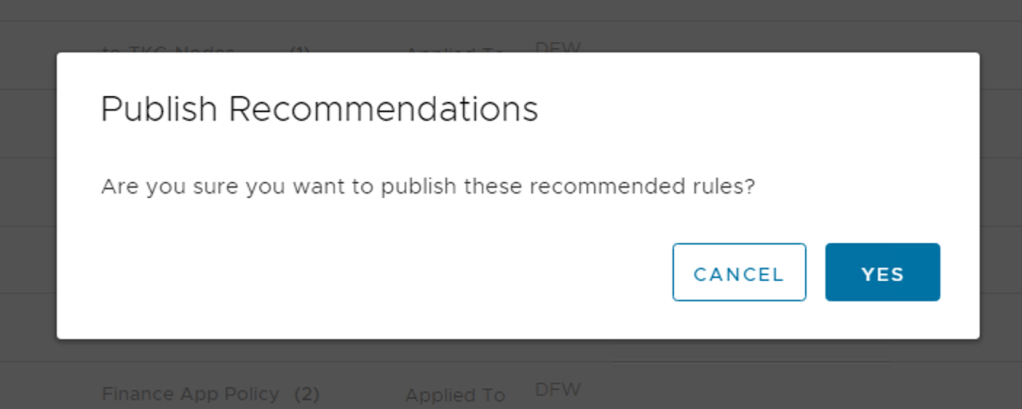
Once the placement of the recommended policy is done, click Publish and Yes
You can now view the published rules in the Distributed Firewall Table – click on View in Distribute Firewall Table

You can expand the recommended policy section to view all the rules which have been published to NSX Distributed Firewall

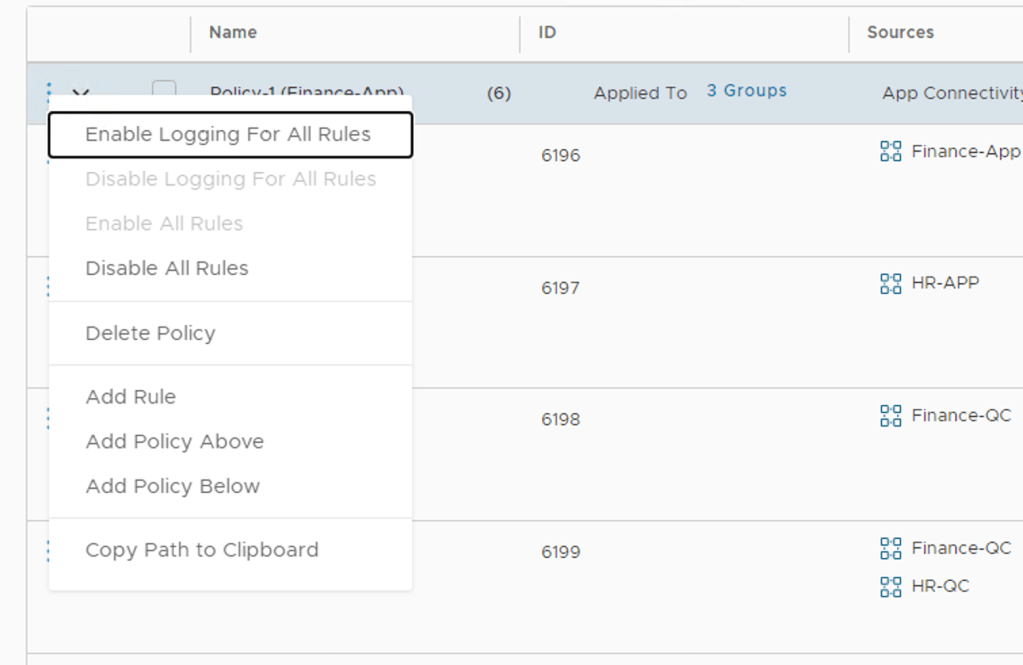
One last bit I would highly recommend is enable logging for these rules as needed, by default Logging on the rules are disabled. Click on the 3 blue dots by the Policy name and you will see the option to enable logging for all the rules in this Policy Section.
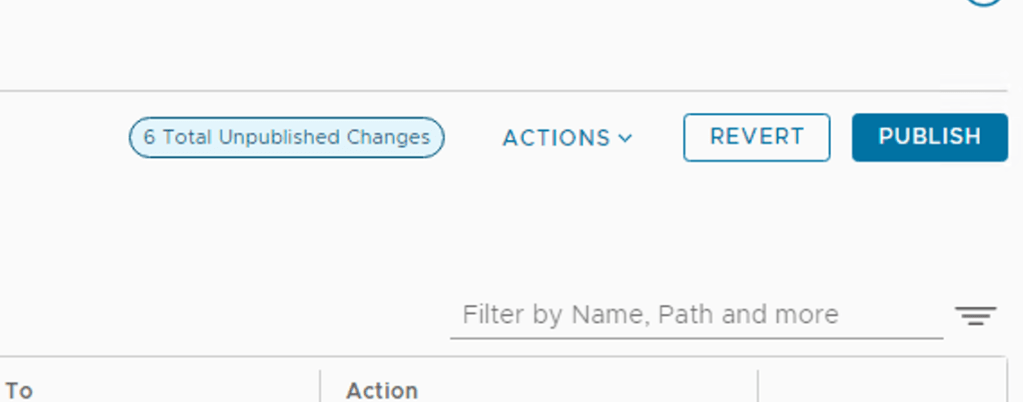
Once you have changed this, don’t forget to Publish the changes on the Top Right
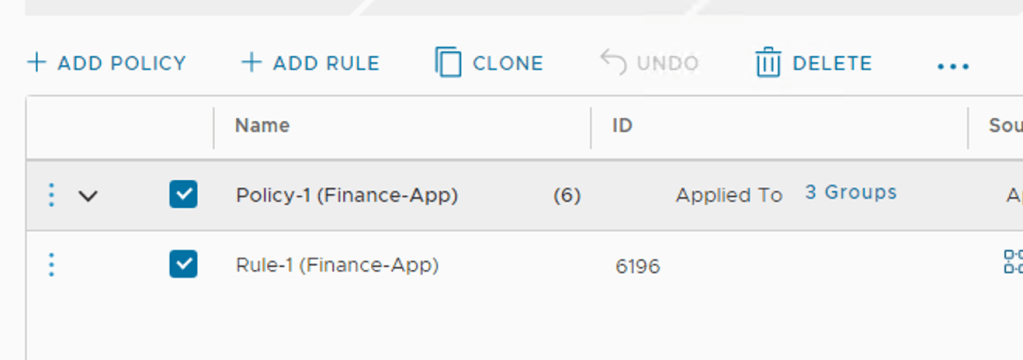
To delete the entire recommended policy just select the Policy name and click Delete and above and then Publish the changes to the Distributed Firewall. Take note that this only removes the Firewall Policies but the Security Groups which got created and the membership to these groups is still maintained and needs to be manually removed.
The recommendation can be deleted from the UI, Plan & Troubleshoot -> Recommendations. Click on the 3 Blue dots and select delete.
Note: The Delete action only removes the item from the displayed list. To delete a published rule, go to the Security -> Distributed Firewall page.

Conclusion
I hope that this is helpful to someone trying to deploy and use NSX Intelligence 3.2. I will do some follow up posts looking at the Suspicious Traffic capabilities which also made possible with NSX Intelligence.

2 thoughts on “VMware NSX Intelligence 3.2 Deployment”