
This blog post will be focusing on VMware NSX Network Security features using VLAN backed networks and hopefully help demystify the topic. It covers the deployment and ends with some demonstrations.
Overview
In the most recent NSX-T 3.2 release, VMware introduced Switch agnostic distributed security – Ability to extend micro-segmentation to workloads deployed on vSphere networks. Simple statement, but what does this really mean to the vSphere/NSX admin? Before we can answer that, it might help to look back at the history of NSX from a virtual switch view.
In NSX for vSphere (AKA NSX-V) we used the virtual distributed switch (vDS) which was present in the vCenter and the admin would enable distributed Firewall policies to VLAN or Overlay backed workloads. The admin did not need to create any additional port group/logical switch/segment as NSX for vSphere used the port groups already in place.
When NSX-T 2.X was released, we were introduced to the N-VDS. This N-VDS virtual switch was configured & managed by the NSX-T Manager and required the host to have dedicated physical nic cards connected to this N-VDS. You then created logical switches in the NSX-T manager which would represent port groups in vCenter where workloads got connected too. NSX-T Distributed Firewall would only work for workloads connected to these logical switches (NSX-T 2.X terminology) created by NSX-T manager (VLAN Backed or Overlay are both supported). vSphere admin can not edit or change any settings on these logical switches.
With NSX-T 3.0 support for the newly introduced VDS 7.0 in vSphere was introduced. This meant you could now use the VDS 7.0 created in vCenter for NSX Network & Security without the need to deploy the additional N-VDS. But… NSX Distributed Firewall and the newly introduced NSX distributed IDS would only work when your workloads are attached NSX-T created Segments (NSX-T 3.X terminology). What this meant is that you would need to go to the NSX-T Manager and create new VLAN backed networks/segments and then migrate VM’s vnic from their existing VDS created port group to the newly created NSX-T segment.
NSX-T 3.2 takes care of all of this and much more as we can do all these NSX Network Security features without the need to create an N-VDS or new segments and no no need to migrate workloads between port groups. We just do the NSX-T host preparation and we are ready for action. This is supported from vSphere 6.7 & VDS 6.6 and later.
Introduction
You can install Distributed Security only for a vSphere Distributed Switch (VDS). In other words, you can have Distributed Security on a VDS without the need to deploy a NSX Virtual Distributed Switch (N-VDS).
The following Distributed NSX Security capabilities are supported when using only the VDS:
- Distributed Firewall (DFW)
- Distributed IDS/IPS
- Identity Firewall
- L7 App ID
- Fully Qualified Domain Name (FQDN) Filtering
- NSX Intelligence
- NSX Malware Prevention
- NSX Guest Introspection
Installation Process
When you install Distributed Security, configuration changes occur only in NSX-T and there are no changes in vCenter Server. The details of the VDS are discovered and the following objects are automatically created in NSX-T to represent the VDS details:
- A transport node profile for each cluster.
- A host switch for each VDS.
- A VLAN transport zone for each VDS.
These objects are system-generated and are not configurable or editable.
Also, as part of the VDS discovery, the Distributed Virtual port groups (DVPG) and DVports of the VDS are created as objects in NSX-T. See the output at the end of the blog.
Prerequisites
The following are the requirements for installing Distributed Security for VDS:
- vSphere 6.7 or later.
- The vSphere cluster should have at least one VDS with distributed switch version 6.6 or later configured.
- The vSphere cluster should not have N-VDS deployed.
- A compute manager must be registered in NSX-T
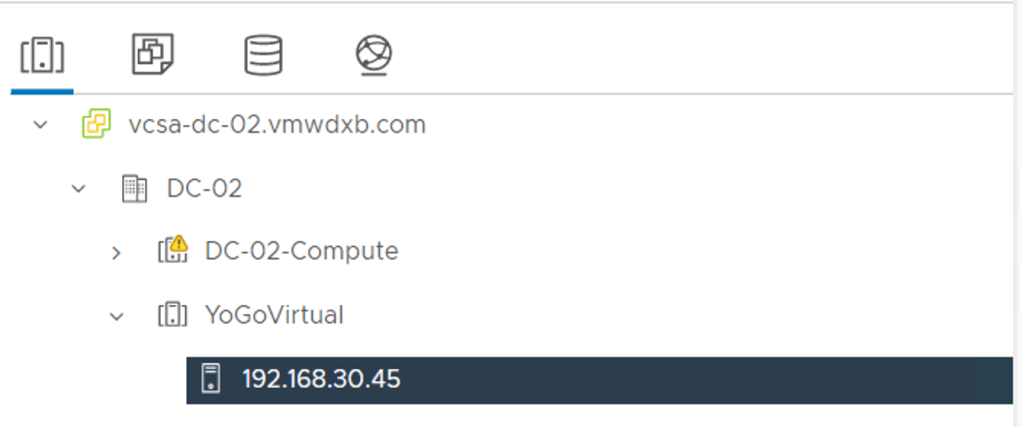
Some Pre Work done – I created a new a cluster in my vCenter – YoGoVirtual and I have a single ESXi host in the cluster (esxi-dc02-05 / 192.168.30.45)
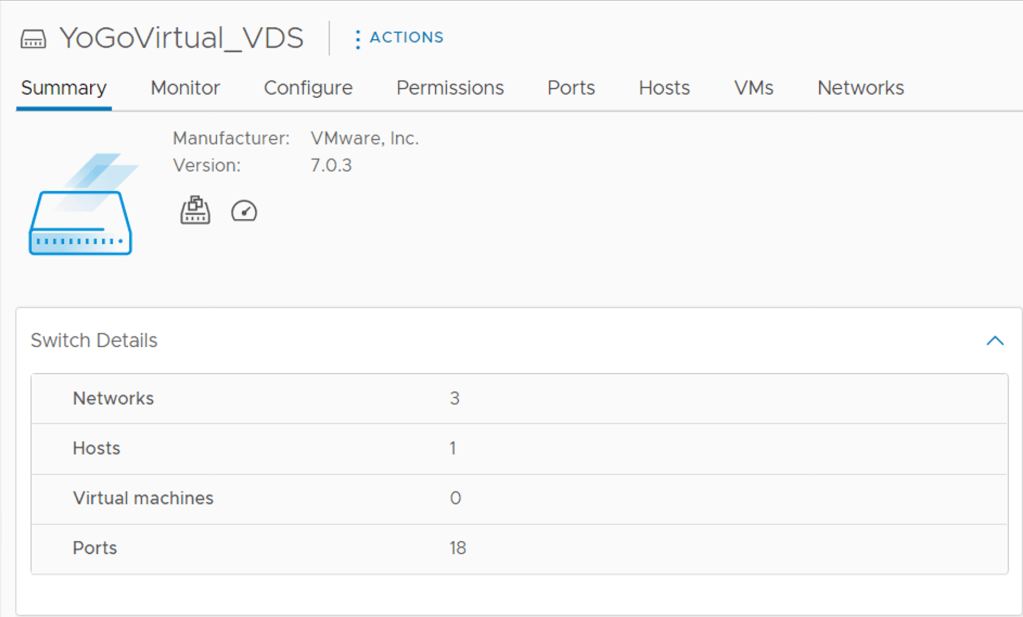
I then created a new VDS (YoGoVirtual_VDS) which I have my ESXi host connected too
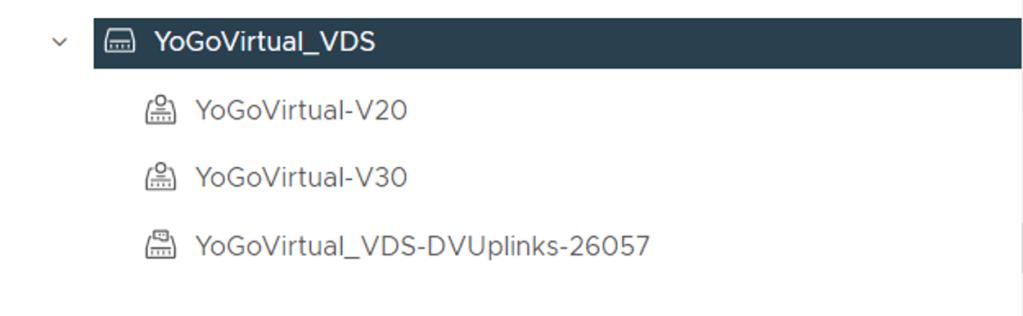
I went ahead and created to VLAN backed port groups with VLAN’s 20 and 30
Procedure
Step 1 – Open the NSX-T Manager UI
Step 2 – We are going to use the Quick Start Prepare Clusters for Networking and Security functionality
NSX-T Manager -> System -> Quick Start

Step 3 – Click GET STARTED
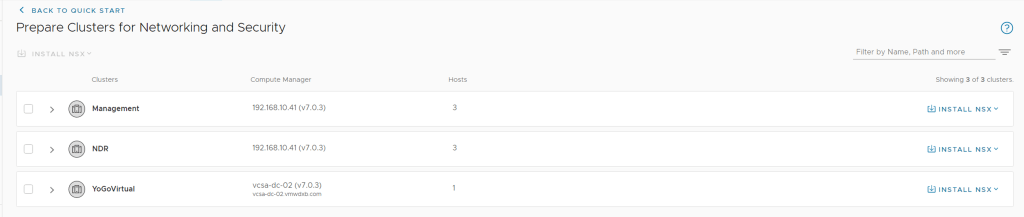
Step 4 – Select the vCenter Cluster you want to install NSX Security
In my case, I want to install NSX Security in the YoGoVirtual Cluster, so select the cluster on the left hand side box.
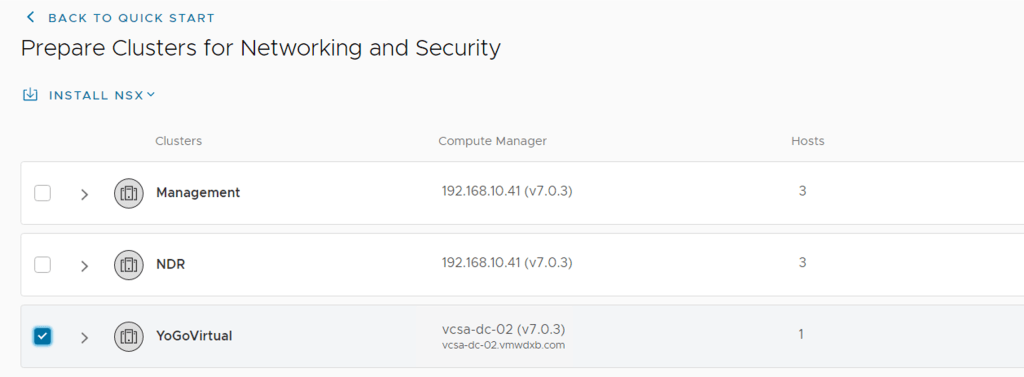
Step 5 – Click Install NSX on the far right hand side for the selected cluster.
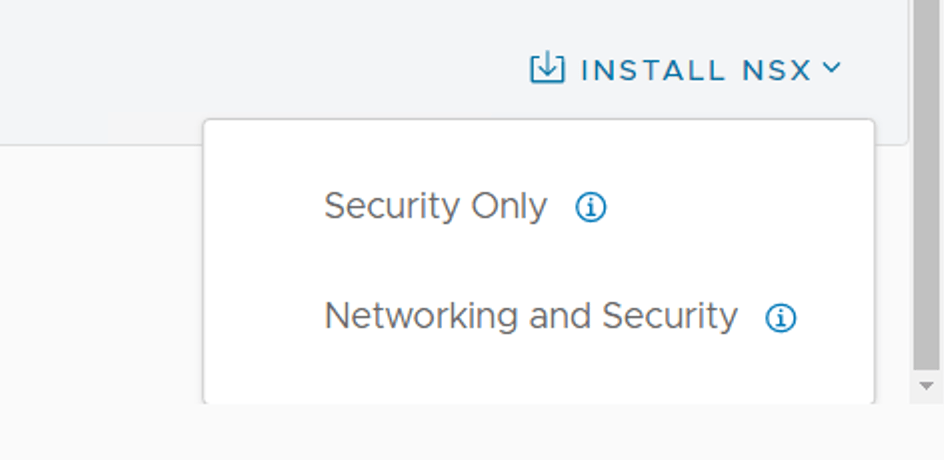
At this point you are presented with Security Only or Networking and Security
- Security Only will only prepare the cluster for distributed security using VLAN backed networks
- Networking and Security will add Overlay networking capabilities on top of the security features
Step 6 – Since this post is focused on Security, I selected the Security Only option and clicked Install

Step 7 – Monitoring the deployment
You can monitor the deployment progress from the Quick Start Wizard dashboard or from the Fabric view in the NSX-T Manager

From the NSX Manager -> System -> Fabric ->Nodes -> Compute Manager -> Host Transport Nodes

Once the installation has completed, you should see the success status green

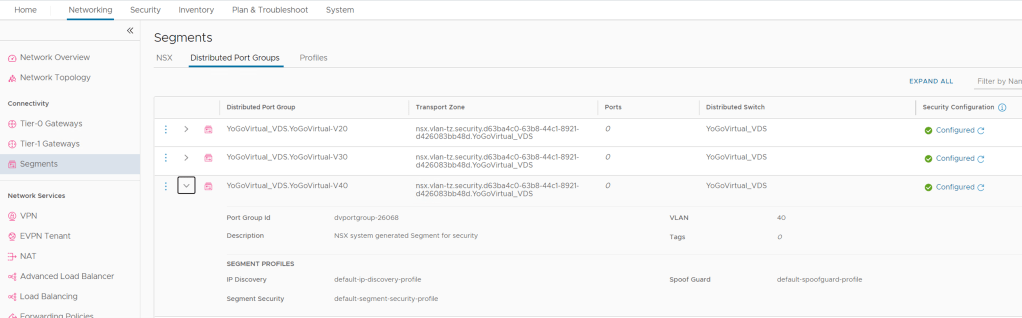
Step 8 – Review vCenter discovered Port Groups
Part of the installation process is to discover and import the port groups which where already configured on the VDS. In my case I had those two portgroups for VLAN 20 and VLAN 30. Lets see where these went too in the NSX-T UI
NSX-T Manager -> Networking -> Segments -> Distributed Port Groups

Here we can see the two port groups discovered all relevant VLAN ID’s and I can see that these are configured and ready for NSX Security.
Step 9 – Create a new Port Group from vCenter
I created a new Port Group in vCenter YoGoVirtual-V40

Then went back to the NSX-T UI, refreshed the page and this newly created network showed up with all the correct settings and security installed.
Demonstration
I put a quick topology together to demonstrate some of the distributed security features using the vDS port groups which we created by vCenter. My Yo Go Virtual Server is connected to VLAN30 with the default gateway outside of NSX and terminated on L3 Switch.

From the NSX-T UI, I enabled NSX IDS/IPS and NSX Malware Prevention for this newly prepared Cluster
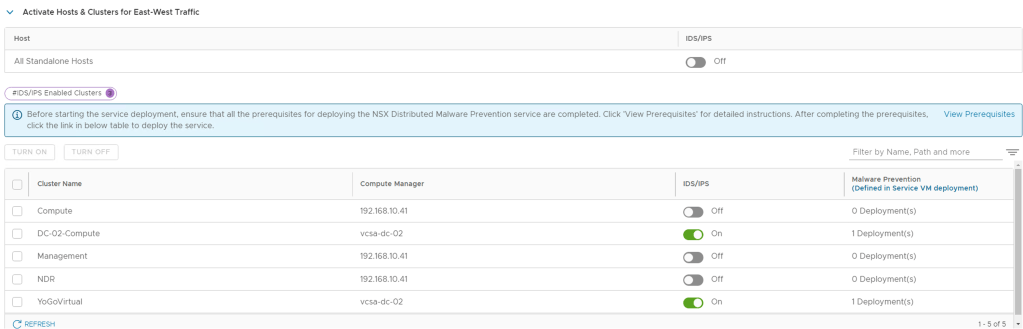

Remember to make sure you have the full package installation of VM Tools if you are creating new test workloads for this cluster and you planning to use the Malware Prevention capability.

Distributed Firewall Test
In this I will apply a simple policy to my YoGoVirtual Server that allows on FTP access to my FTP Server, the server has an IIS Web Service running too and I will block this access for the demo.

FTP Test
From LogInsight, I see that the FTP connection is allowed from YoGoVirtual to the FTP server and it matched rule ID 7145.

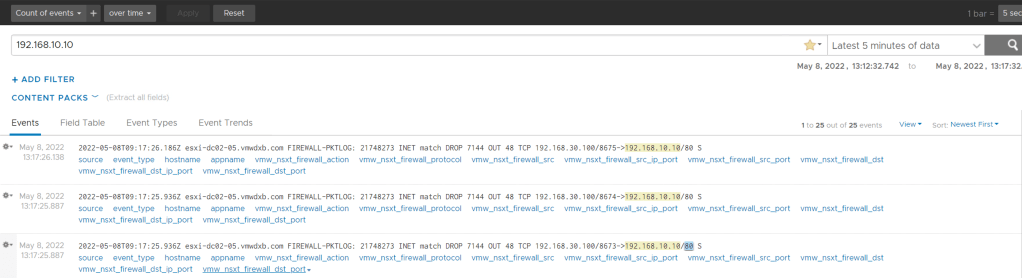
HTTP Access Test
From my YoGoVirtual Server, I am using the chrome browser and trying to access the web server hosted on my FTP/HTTP server
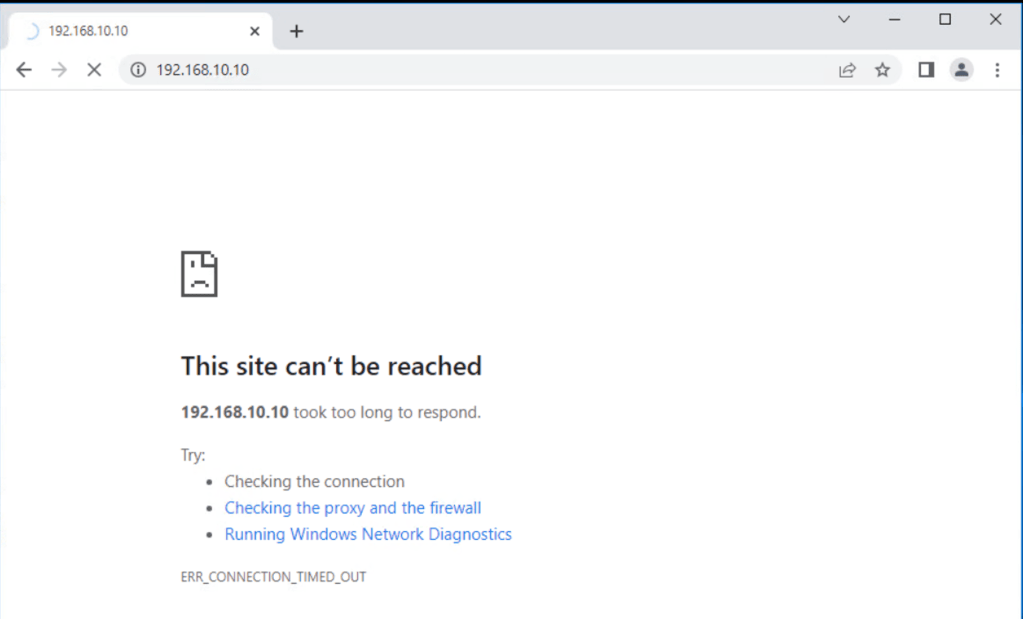
From LogInsight we can my YoGoVirtual trying to access the HTTP server and the connection is matching rule 7144 and this connection is being dropped.
Distributed Malware Prevention Test
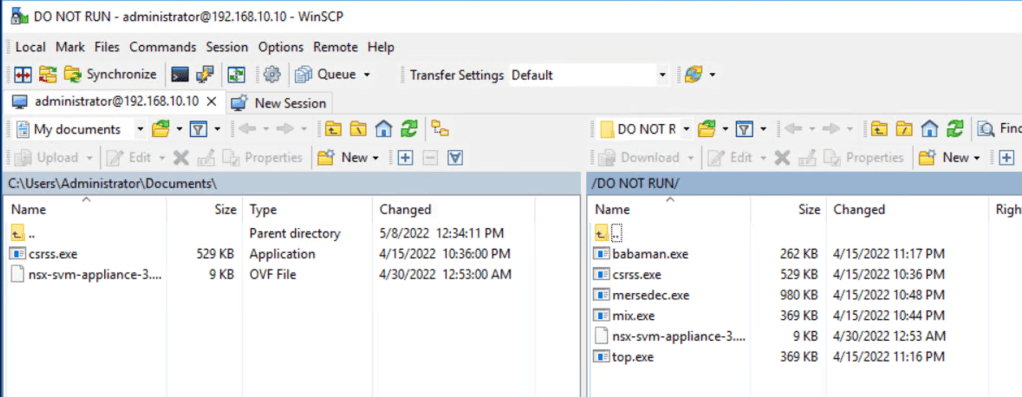
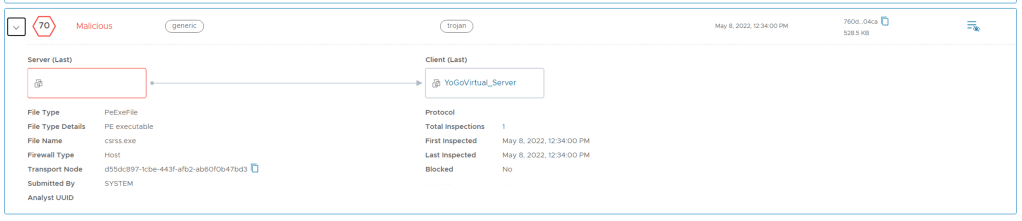
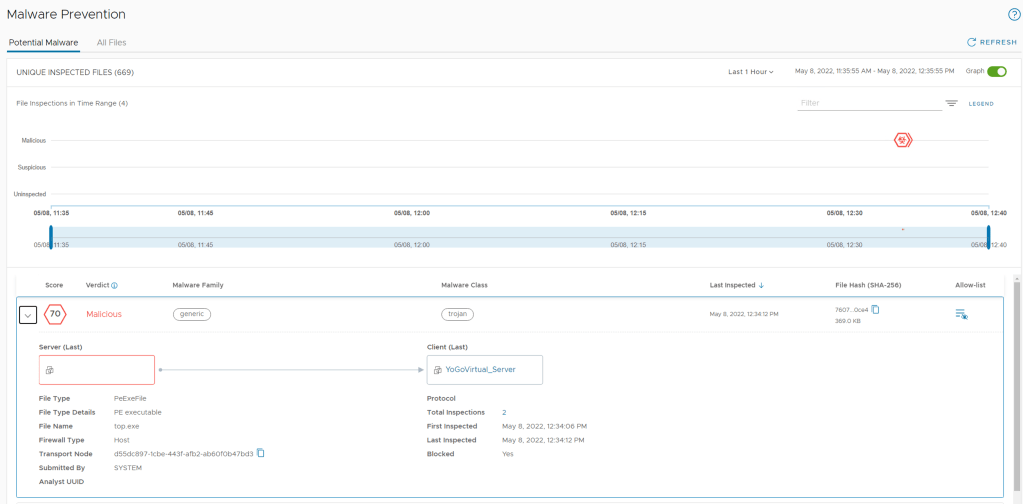
I performed an FTP from my YoGoVirtual Server to my FTP server where I previously downloaded some malware files and copied across all six files shown below on the right hand window.
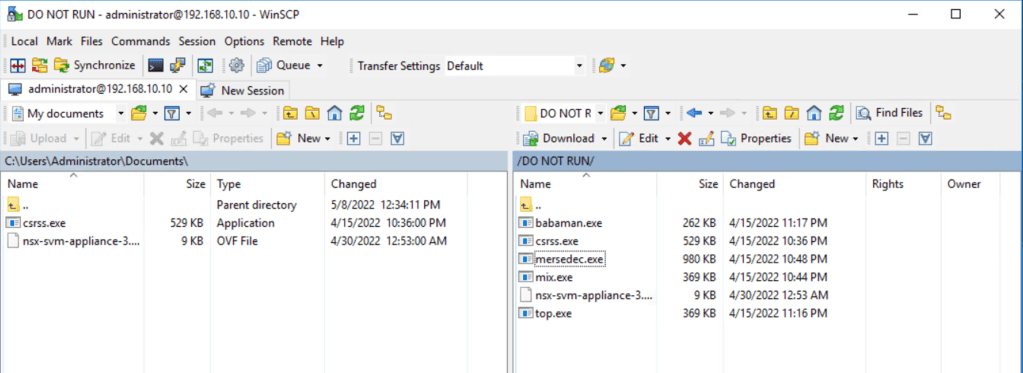
Interesting to see Windows 2016 Defender Server detected some of the files as Malware and removed them after the download took place. Except for file which was positively detected as Malware by NSX.
Below we can see that file named csrss.exe is identified as Malware by NSX.
Distributed IDS/IPS
I am going to use the NMAP tool running on my YoGoVirtual machine and just do a port scan on 192.168.10.0/24 in my lab and this should trigger one of the IDS/IPS signatures.

After running the scan, it triggers signature ID 1069564 which detects my YoGoVirtual server connecting to my DNS server (192.168.10.5) on SMB TCP port 445.
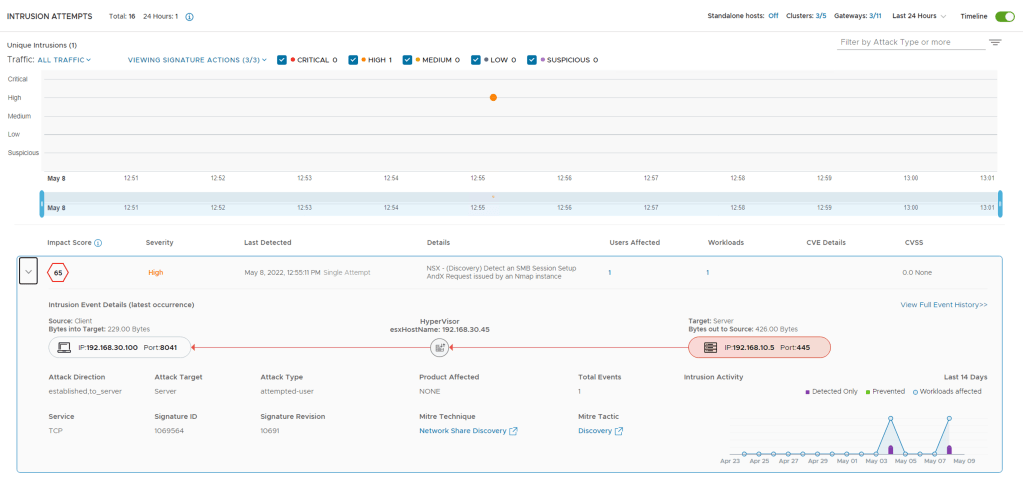
Signature ID 1069564 – NSX – (Discovery) Detect an SMB Session Setup AndX Request issued by an Nmap instance

Conclusion
Once Distributed Security is installed you can easily begin using NSX Security capabilities. I demonstrated how to prepare the cluster for NSX Security only – without any downtime or maintenance mode requirements and then how three major NSX Advanced Threat Prevention use cases worked on native VDS port groups without any network changes or virtualization settings.
An observation, I noticed that my port groups only appeared under the distributed port groups menu in the NSX UI after the vSphere Cluster was prepared following the steps above.
For cluster(s) which already had NSX installed using the vDS, the port groups created in vCenter were NOT imported to NSX-T. So I am going to assume at this stage that we can only use the Switch Agnostic feature for new vSphere Clusters which have not been prepared by the NSX-T manager before. You could still do all these Security features with VLAN backed networks but they would need to be created as segments.

look forward to your next post
LikeLike