This is a follow up to my previous post where I covered NSX Malware Prevention & Detection deployment. Now I will cover what needs to be configured beyond the NAPP deployment and the SVM deployment for distributed Malware Prevention or the NSX Edge VM for Gateway Malware Detection.
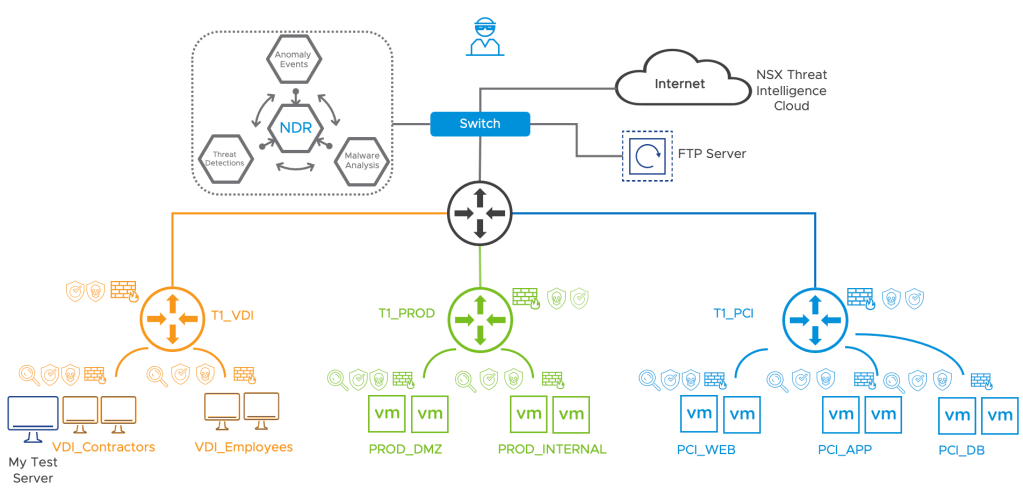
Overview Demo Setup
I have NSX-T 3.2.0.1 deployed with VMware ESXi, 7.0.3, 19482537 and vCenter 7.0.3. The NSX Application Platform is deployed and the SVM’s for distributed Malware Prevention are deployed too.
For the distributed Malware Prevention which uses the Guest Introspection framework, I am going to use a Windows 2012 server (shown as My Test Server in the diagram) with IP Address 172.16.1.30. This machine has the required VM Tools installed. I will use this test machine to download some malicious files from the Internet and trigger the Malware Prevention feature in NSX. We should be able to see some malicious content which is detected by the static analysis done on the SVM and will be able to see malicious content which requires dynamic analysis in the NSX Intelligence Cloud. So NSX is going to send this file to the cloud Sandbox for analysis. If you don’t to send files for dynamic analysis I will cover how to disable this option.
The Gateway Malware Prevention will be done at the T1 Uplink T1_VDI in my demo topology – Take note that this feature is only supported on the T1 uplink interface today and not supported on the T0. The Gateway Malware Detection feature leverages the NSX Gateway Intrusion Detection and Prevention (IDPS) feature for file extraction, Gateway IDS/IPS is only Tech Preview in NSX-T 3.2.0.1 and should be generally available from NSX-T 3.2.1 – so take care when enabling Gateway IDS/IPS.
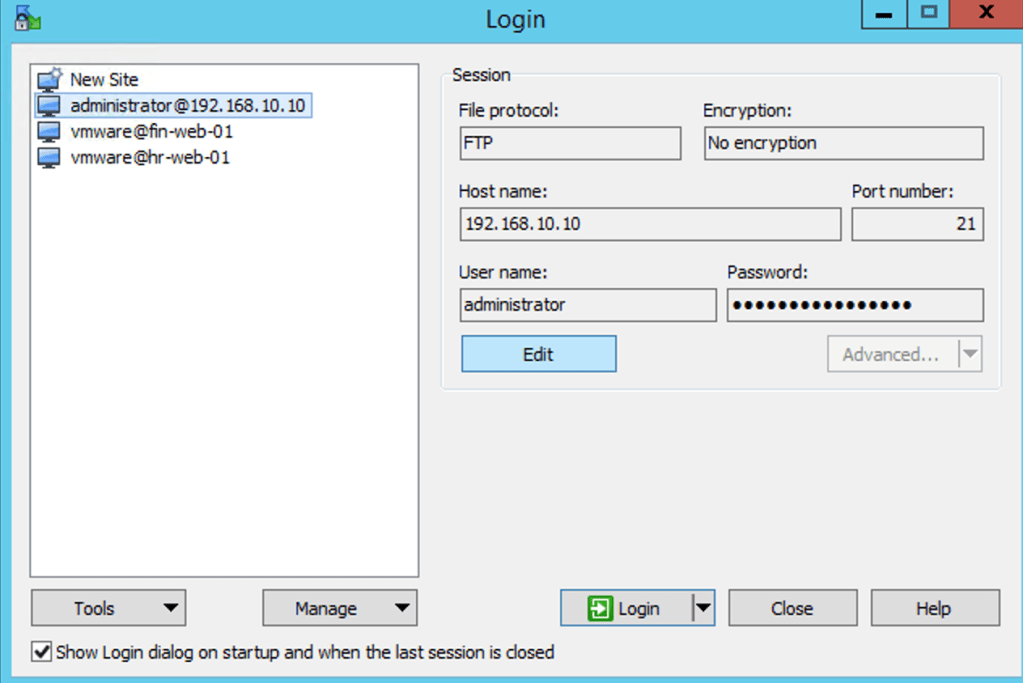
I will download some Malicious content to the FTP server (192.168.10.10) which is located outside of my NSX environment to the My Test Server and trigger the Malware Detection feature on the T1 uplink.
NOTE: In NSX-T Data Center 3.2, NSX Distributed Malware Prevention service can detect and prevent malware only on Windows guest endpoints (VMs).
On the distributed east-west traffic, malware detection and prevention is supported only for Windows Portable Executable (PE) files that are extracted by the GI thin agent on the workload VMs (endpoints). Other file categories are not supported currently by NSX Distributed Malware Prevention. The supported maximum file size limit is 64 MB.
Getting Started

I am going to start with the the Malware Prevention profile(s) and move through the various steps. I will split the configurations for Distributed and Gateway Malware Prevention into two parts – they could share profiles, security groups too.
Distributed Malware Detection & Prevention
You will find that Malware Prevention configurations have been placed with the NSX IDS/IPS feature configurations
Step 1 – Create Malware Prevention Profile
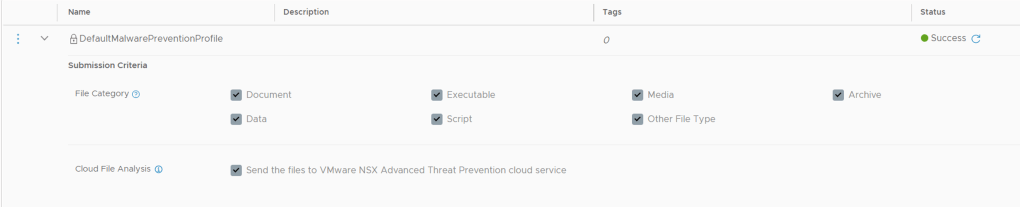
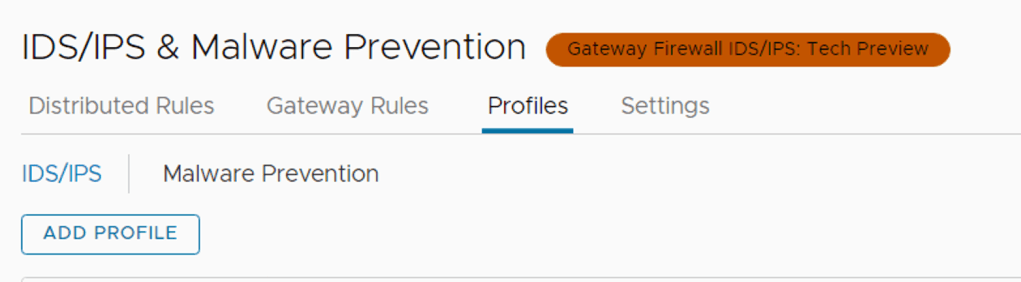
From the NSX-T Manager -> Security -> IDS/IPS & Malware Prevention -> Profiles -> Malware Prevention

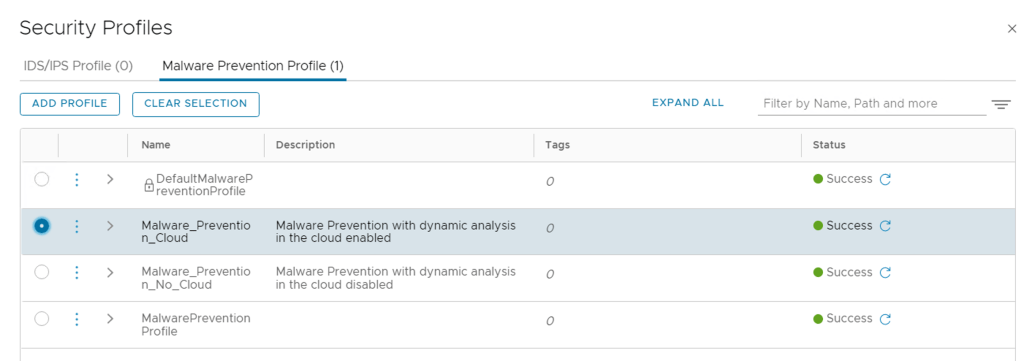
If you click on the grey right arrow (>) next to the name of the DefaultMalwarePreventionProfile it will expand the default settings of this profile. The default profile does not allow you to change anything in it.
So lets create a new Profile by clicking on ADD PROFILE
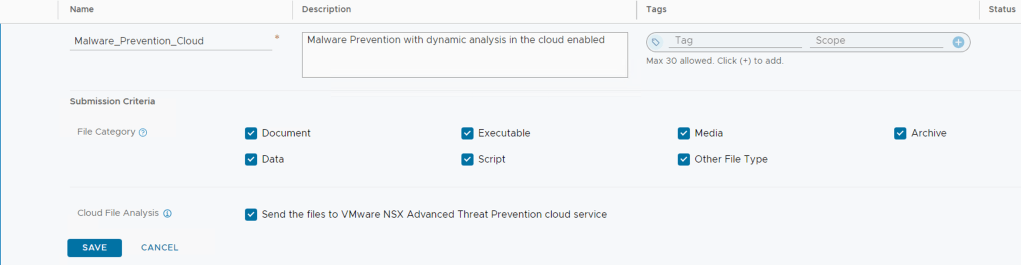
Now give your profile a descriptive name, and here you can select which files types you want to have inspected when we apply this policy to our rules later.
You will also notice the last option is to select if you want files to be sent to VMware Cloud for dynamic analysis – this is the only place configurable for this option.
I have created two profiles, one that allows dynamic analysis and another profile where I have deselected this option. Even though NSX-T 3.2.0.1 only supports Executable files on the distributed deployment today, I have just left my profile with all file types selected since I am going to re-use the profiles for the Gateway Malware Policies.
Click SAVE when done.

Once saved, the status should be green and Success

Step 2 – Create Groups and add VMs you want to protect
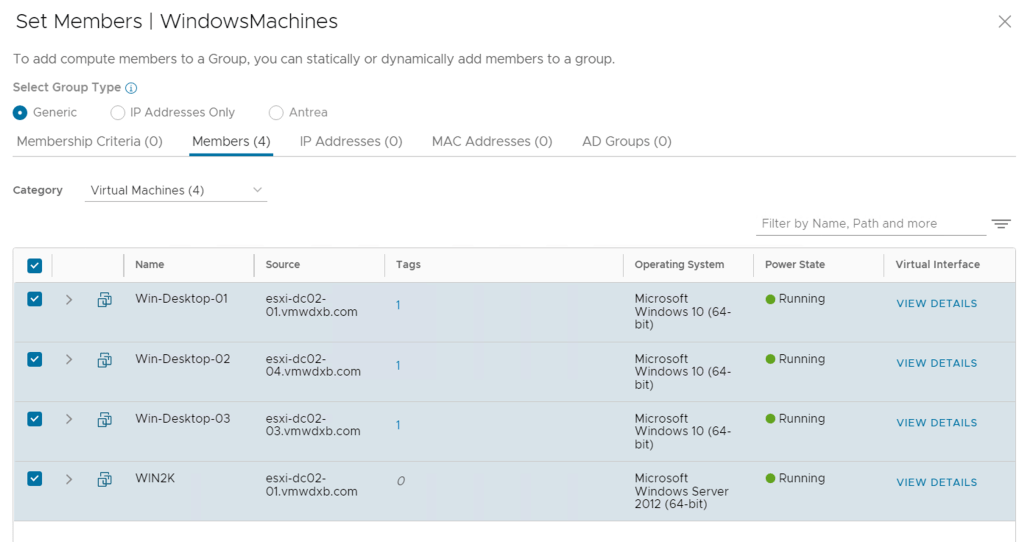
You can use existing groups or create new groups for this part, I created a Group which includes all my Windows machines.
From the NSX-T Manager -> Inventory -> Groups -> ADD GROUP

Click on Set Members -> Members -> Category -> Virtual Machines -> Select the VM’s you want to included -> Apply
I am manually selecting the VM’s I wanted in this group.
Note: Groups for Malware Prevention feature should contain members of type VirtualMachine only
Then click SAVE

Step 3 – Add Distributed Malware Prevention rules
Distributed Malware Prevention Policies are created at the same place where we create IDS/IPS rules, its the profile you apply that differentiates the rule to be IDS/IPS or Malware Prevention
From the NSX-T Manager -> Security -> Policy Management -> IDS/IPS & Malware Prevention -> Distributed Rules -> ADD Policy
Lets start with adding a Policy Section and name it Malware Prevention and add one rule named the same – you can name yours what works for you.

Leave the Source, Destination and Services to their default values “ANY” and select the Security Profile – This will be the Malware Prevention profile created in step 1 (You can select only one profile). Be sure to select Malware Prevention Profile from the top so that it lists the profiles specifically for Malware Prevention and not the IDPS profiles. I selected my Profile that has dynamic file analysis enabled.
Click Apply once you have selected the correct Profile.
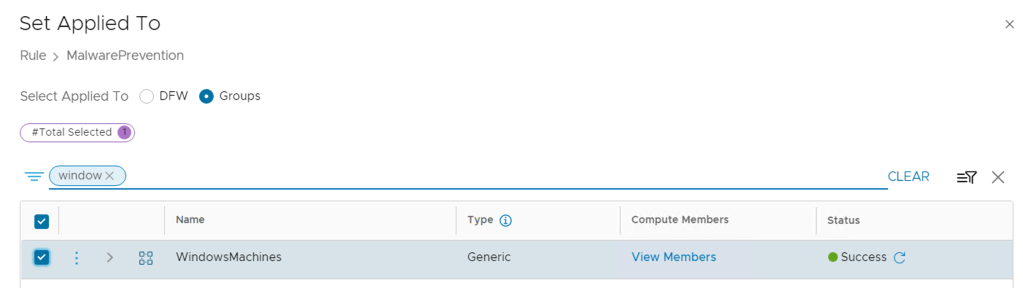
Next you need to apply this rule to the Group of VM’s which you want to enable the feature on, so select the Group which you created in Step 2. I am using my group WindowsMachines. Click Apply.
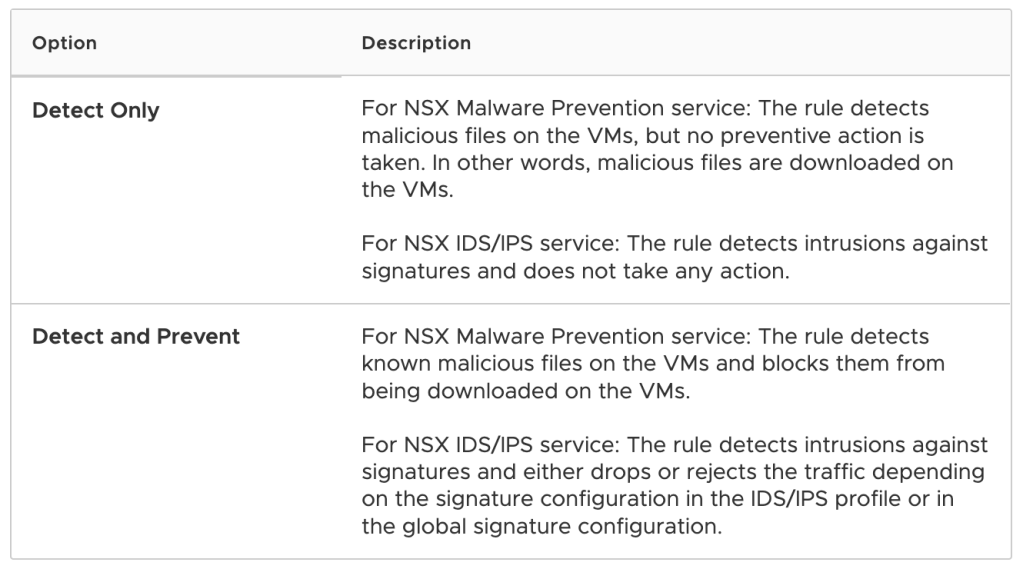
The final option is select the MODE, it can be Detect or Detect & Prevent. I am going to use Detect and Prevent.
The optional configuration bits like Logging, Direction, Log Label are not used by Malware Prevention and can be ignored.
Once the rule is created, you need to Publish the changes on the top right

Once published, the status should show Success

Gateway Malware Prevention
For Gateway Malware Prevention the configuration steps are very similar to the distributed capability with a few additional touch points and configurations.
Step 1 – Enabled Gateway IDS/IPS and Malware Prevention
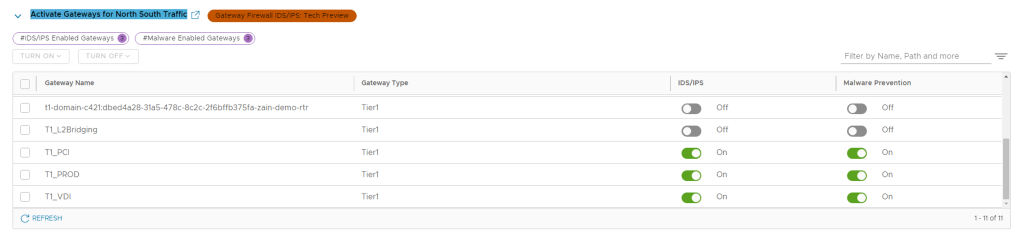
From the NSX-T Manager -> Security -> Policy Management -> Settings -> Activate Gateways for North South Traffic
Since Gateway Malware Prevention uses Gateway IDS/IPS and is implemented on the uplink of the T1 router, we need to enable these capabilities for the selected T1’s. In my case I have selectively enabled IDS/IPS and Malware Prevention. I am expecting my FTP flow to pass the T1_VDI.
Step 2 – Add Gateway IDS/IPS and Malware Prevention Rules
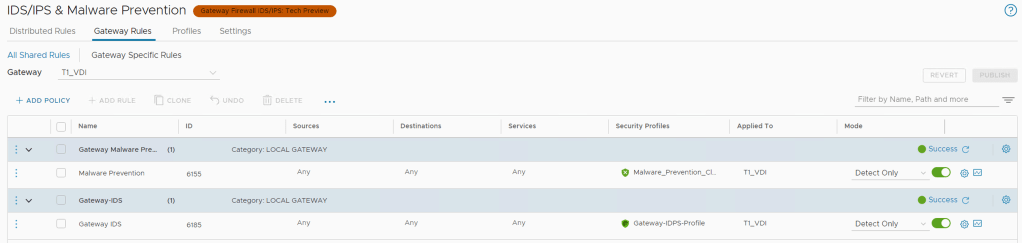
From the NSX-T Manager -> Security -> Policy Management -> IDS/IPS & Malware Prevention -> Gateway Rules
NOTE: You need a IDS/IPS Profile for this section, you can reuse the default one or create one for your needs, I created one that I named Gateway IDPS Profile and left it default with everything checked.
Select the T1 Gateway where you want to enable the features. Next to Click the drop menu that lists the T1 Gateways in your environment and select the first one you want to configure. T1_VDI in my case.
Similar workflow to the distributed Malware Prevention rules, but here we need to add one more rule that enables IDS/IPS too so I created one Policy section for Malware Prevention and re-used the same Cloud enabled Malware Profile and another Policy with a rule for IDS/IPS and selected the IDS/IPS Profile here.
Take note of the below points
- On clicking the edit icon, the UI displays a list of all available services. However, NSX Malware Prevention currently supports detection of file transfer only for the following services: HTTP, HTTPS, FTP, and SMB.
- NSX Malware Prevention on the Gateway Firewall currently does not support extracting and analyzing files that are uploaded using HTTP. However, if files are uploaded using FTP, the extraction and analysis of the files for detecting malicious behavior is supported.
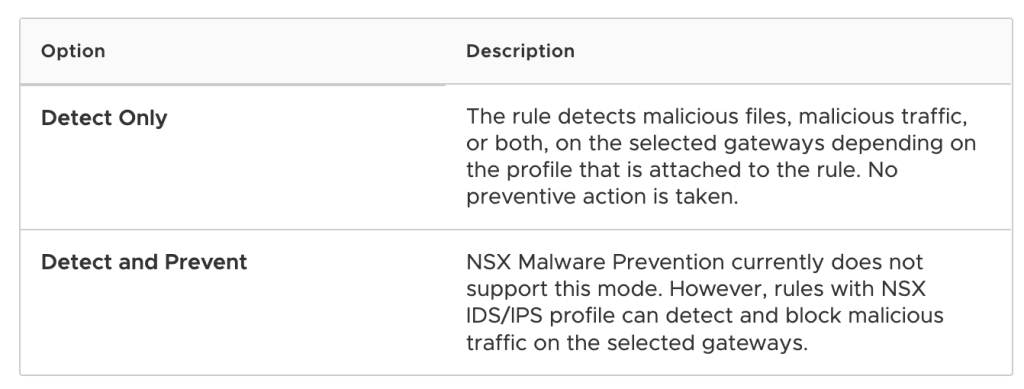
- Mode, Only Detect is currently supported on the Gateway – see below.
Once you have published the rules you should see the status Green and Success
Demonstration of Malware Prevention
Now that all the configurations are in place, we are ready to test it. Lets check the status dashboard
From the NSX-T Manager -> Security -> Malware Prevention

From the NSX-T Manager -> Security -> Malware Prevention -> All Files

So from these two dashboard we currently don’t see any events for the last hour, you can adjust the time range at the top right from 1 Hour to 14 Days

Test 1 – File Download from the Internet on My Test Server (Win2K – 172.16.1.30)
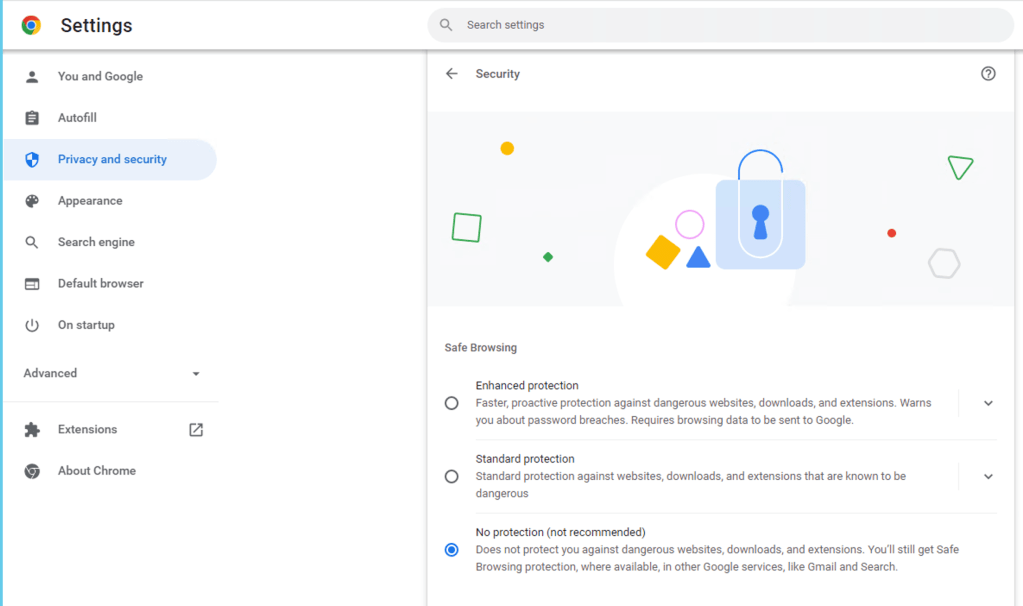
For this test I am using the Chrome browser and I have set the Security settings to “No protection”
I will be using this site to source well known malicious content hosted out on the Internet (https://urlhaus.abuse.ch/browse)
I suggest you proceed with caution as the links on this site are links to the real deal malicious files.
In the Browse Database search bar I am going to filter to .exe files, you will see the URL’s to the malicious files listed under Malware URL. You need to copy this URL and paste it into a new tab in Chrome to initiate the download of the Malware. Since this is test I will only download the file and NOT down and run the file. ***PERFORM THIS STEP AT YOUR RISK, NOT ALL THE LINKS HERE WORK****
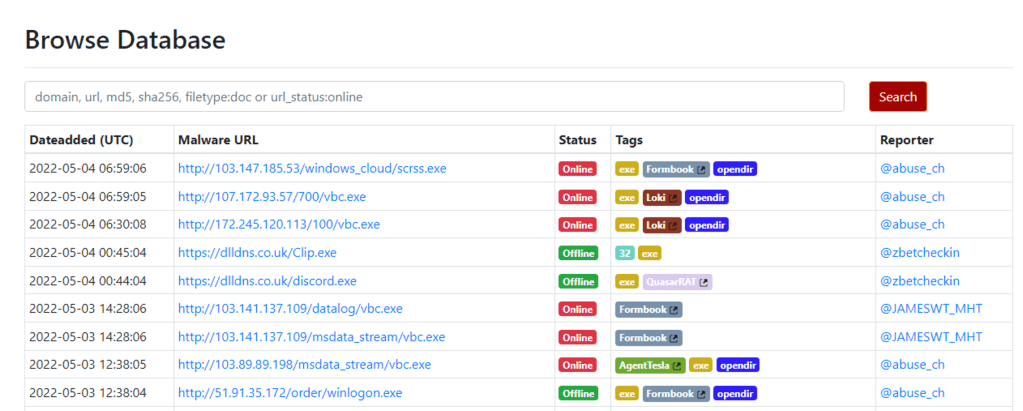
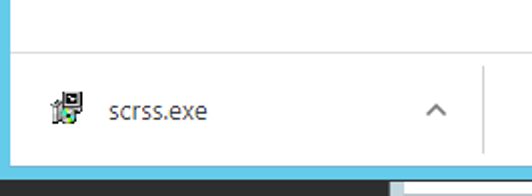
I selected the first URL, copied the link and paste it to a new TAB and you can see the file is downloaded to my machine.

Now if you return to the NSX-T Manager and view the events.
NSX-T Manager -> Security -> Malware Prevention
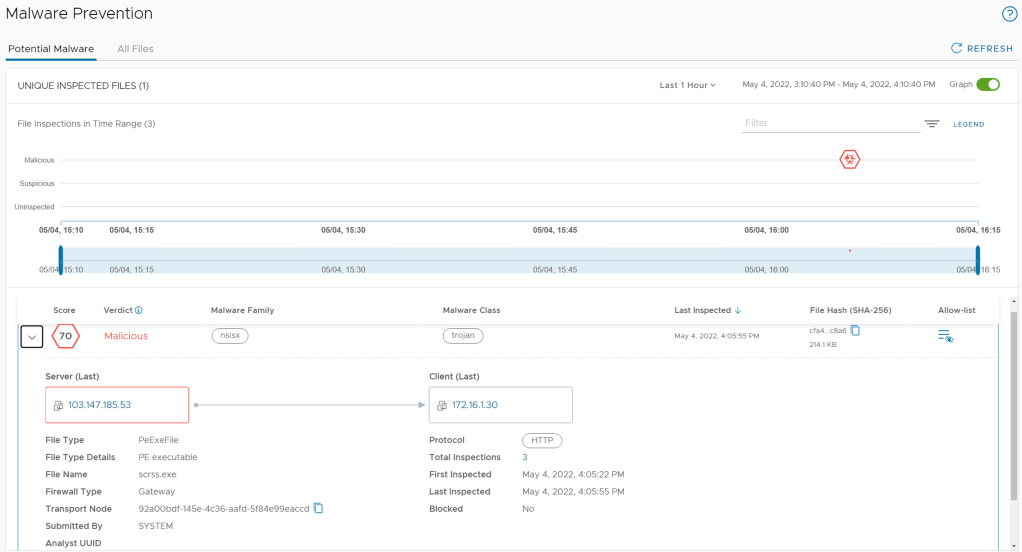
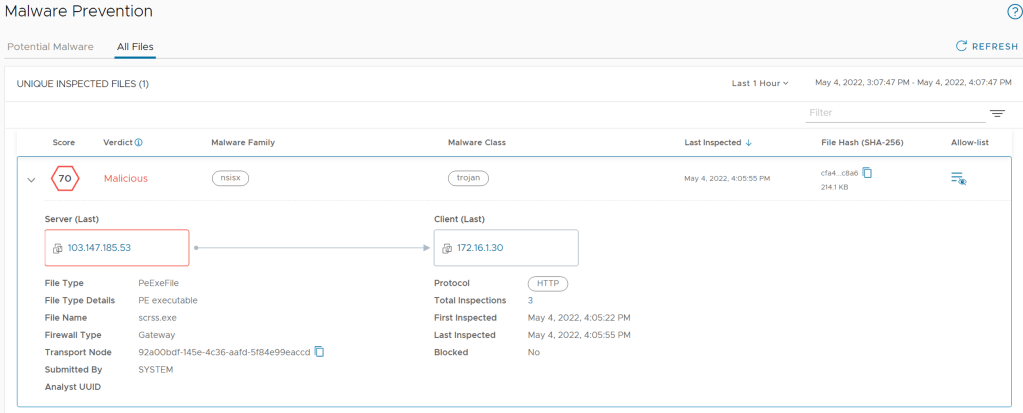
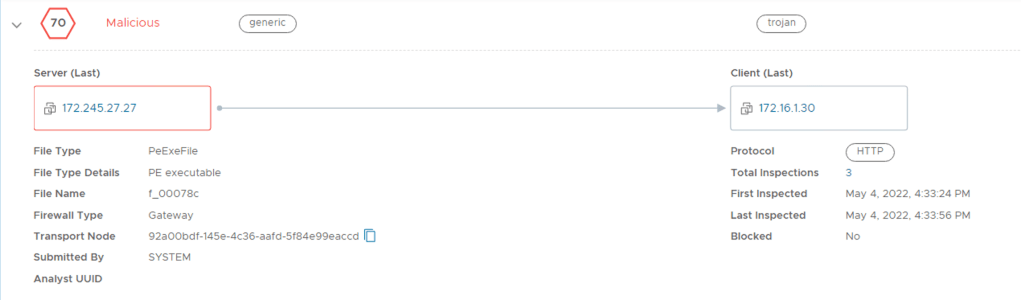
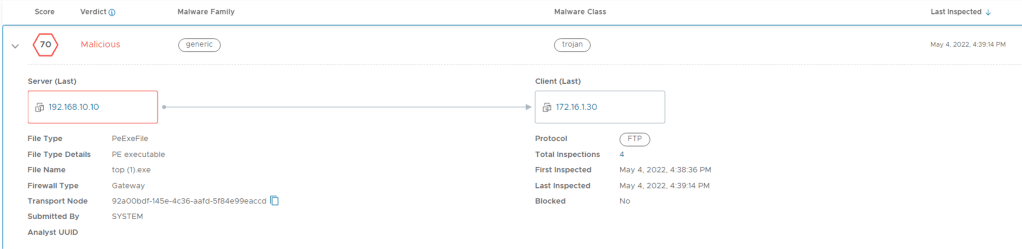
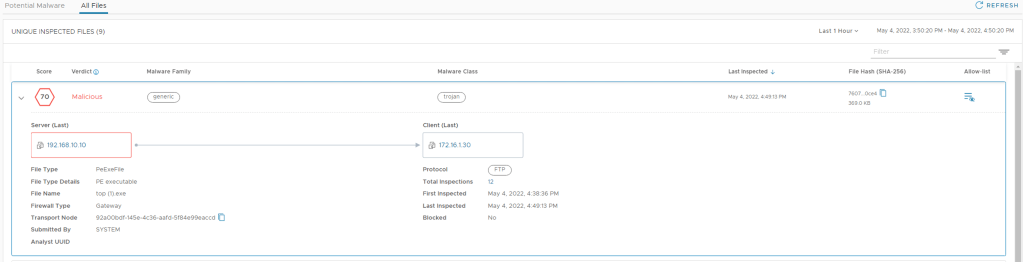
From this you can see that NSX Malware Detection has detected the file downloaded in HTTP and Firewall Type indicates Gateway – This means the Gateway Malware Feature detected the file and the file was not blocked. The file has been identified as Malicious with a score of 70. This is an example of static analysis, the file was identified locally by SVM/Malware Prevention platform and did not need to send the file to the cloud for analysis.
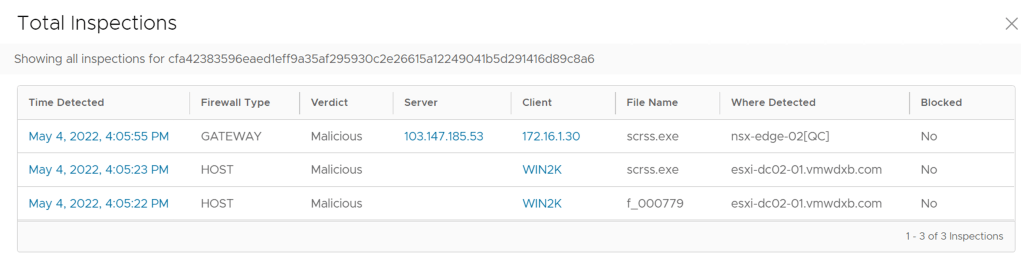
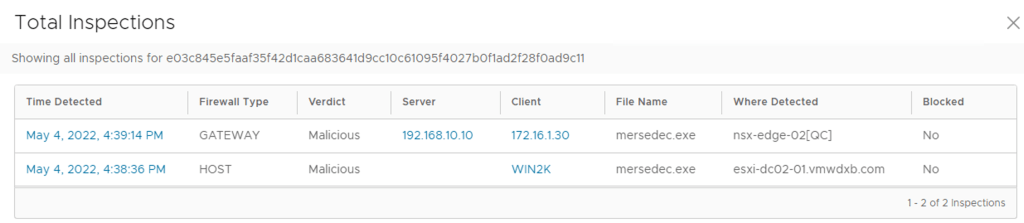
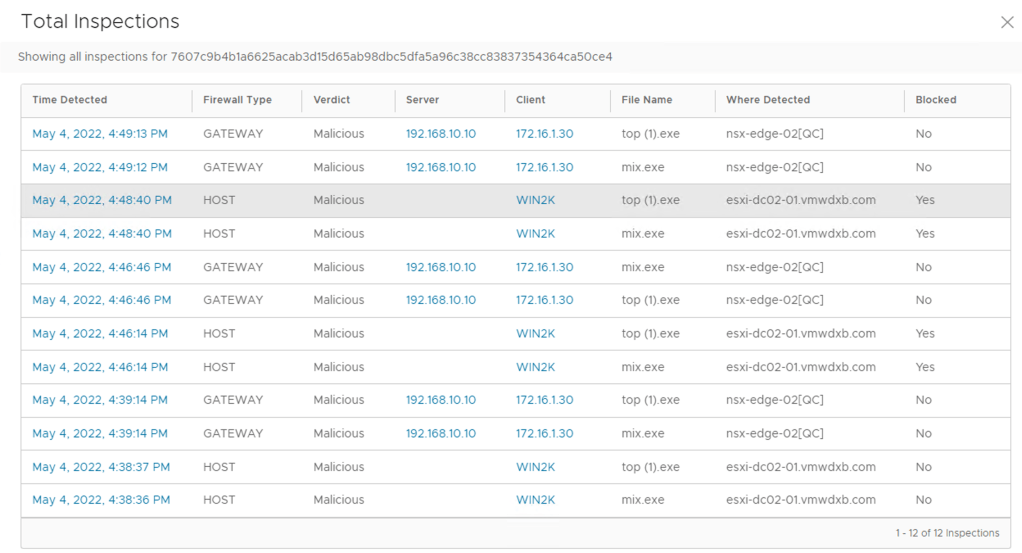
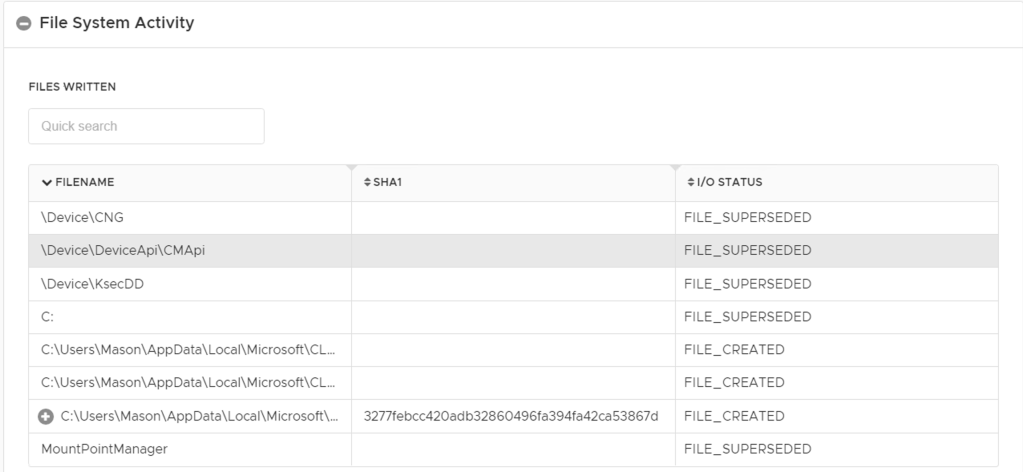
In my case you notice that the file has 3 Total Inspections, if click on the number shown there. It shows me that the file was inspected at the Gateway and on Host and it shows the VM name and ESXi host where the file was detected.
Let me download a few more random files and see if we can trigger the dynamic analysis which will send the malicious file to Cloud for analysis. I tried a few more file downloads and the local static analysis successfully identified each one without the need to send it to the Cloud. Let me search for more.


Test 2 – FTP Files from My FTP Server (192.168.10.10) to My Test Server (Win2K – 172.16.1.30)
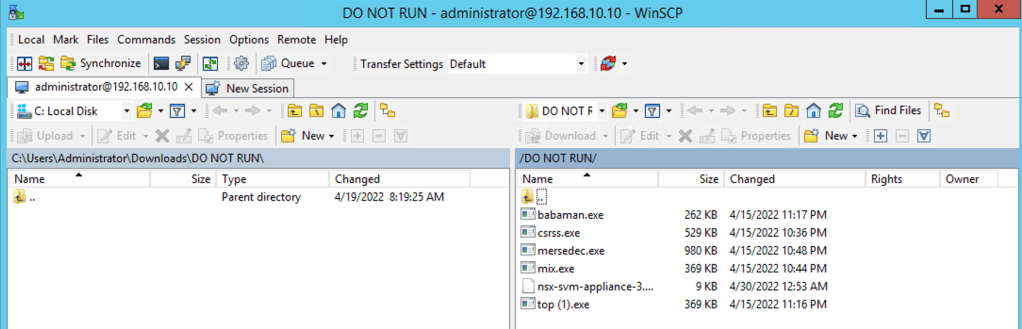
I am going to copy the contents of the directory to my Test Server, these are all malicious files which I previously downloaded from the Internet.
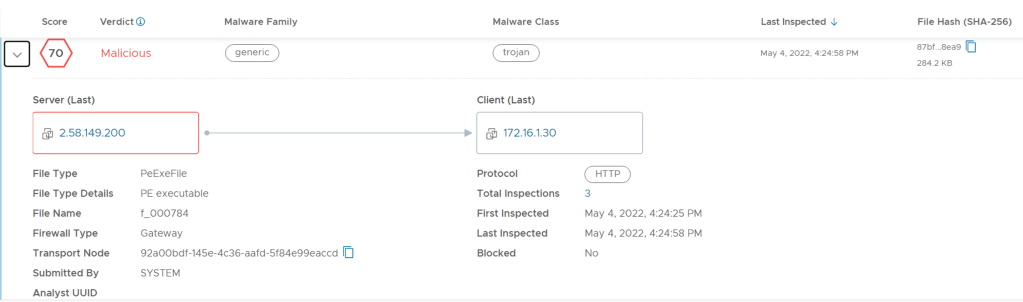
If I go back to the NSX-T Manager, Security -> Malware Prevention -> All Files
I see the files copied and if I drill into one them, the files were detected in protocol FTP

The file is inspected at the Gateway and the host.
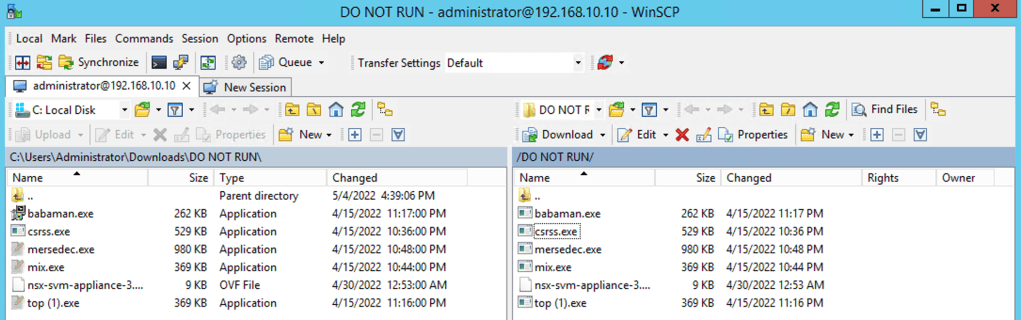
I am going to delete all the files which I copied across from the FTP server from my local Test Server and then try and copy them again – this time I am expecting that the Malware Prevention prevents the files from being copied to my server. The distributed Malware Prevention should now be blocking these files.
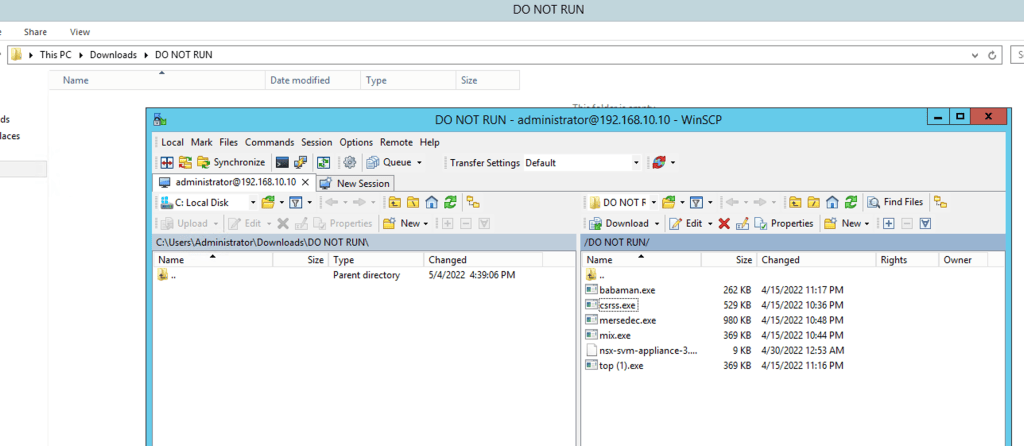
I select all the files and drag them across to my local directory

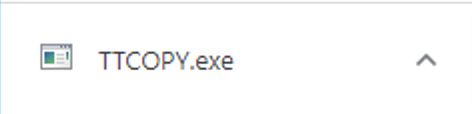
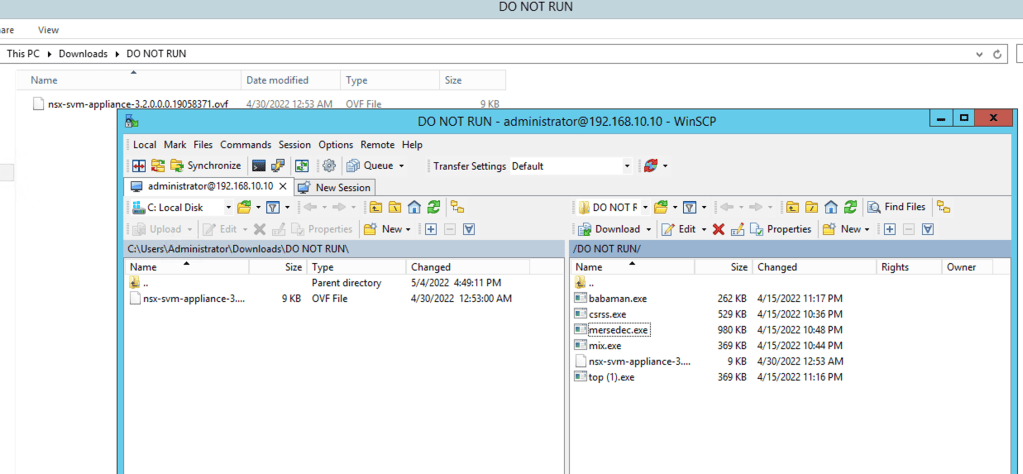
Here I noticed that only the OVF file was successfully copied to my local directory
If I go back to the NSX-T Manager and refresh the page and go to Security -> Malware Prevention -> All Files and I expand the first file at the top of the list
Click on the number in the total inspections
Here I can see the files listed and notice the Blocked action is now YES and it was enforced on the host esxi-dc02-01.vmwdxb.com where my Win2K machine is running.
NSX Network Detection and Response Dashboard
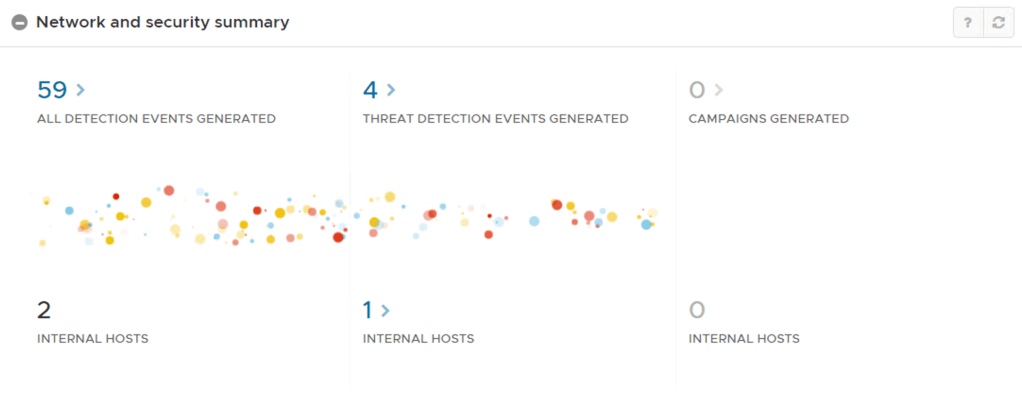
Since NSX IDS/IPS and Malware Prevention feed their events to the NSX Network Detection and Response Component, you can monitor these events from the NDR dashboard too.
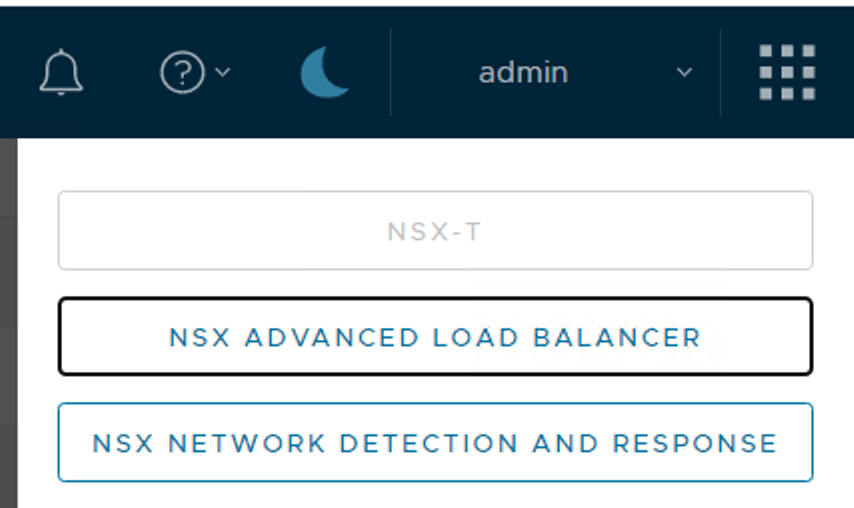
NSX-T Manager -> Home -> Top Right 9 Squares -> NSX Network Detection and Response
This open a new page in your browser to the NDR landing page where you will see all event and you can drill down in to the threat detection events

Conclusion
Once the base installation of Malware Prevention with NAPP is done, enabling and demonstrating the capability was fairly straight forward.
While performing Malicious file download tests for the purpose of the blog, all the files I downloaded were successfully identified by static analysis done locally at SVM and NAPP platform.
I will add a piece to the blog showing the dynamic analysis and file sent to the VMware Cloud Sandbox for analysis when I come across file in future demonstrations.
Update
Friday 20 May 2022
As mentioned at the time of creating this post, I did not match any malware files which needed dynamic analysis done in the VMware Cloud. Fast forward and today I was testing out the updated 3.2.1 upgrade and I have managed to get a file was sent to the cloud for dynamic analysis and it was scored as 100 being Malicious.
You will notice a few extra fields populated Analyst UUID and on the right hand is a report generated.
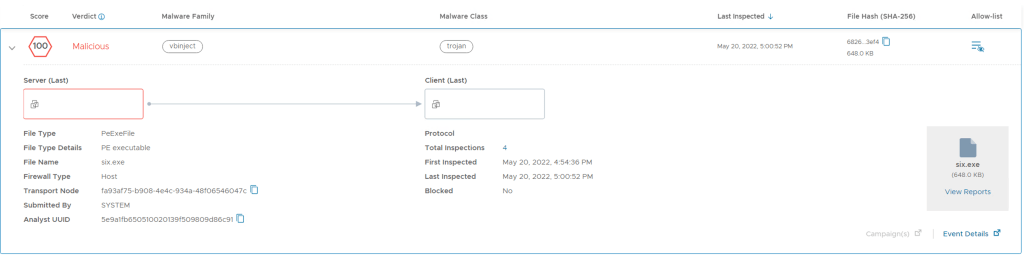
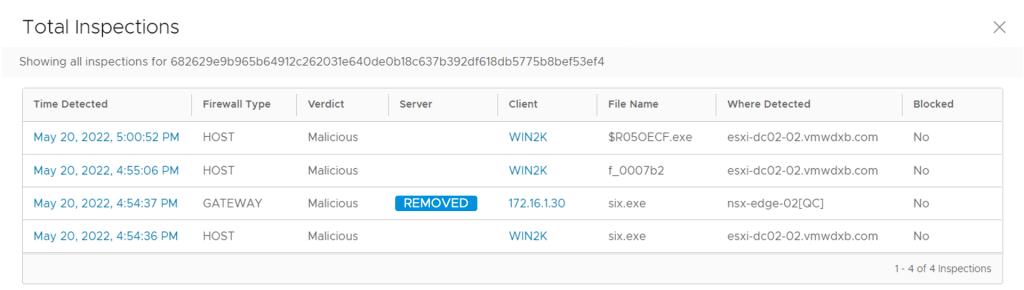
If you click on the value next to Total Inspections, you can expand the details and see where the files was downloaded from, which client it was downloaded too. You will see that the file was inspected at the Gateway and on the host (distributed Malware Prevention SVM)
If you click on View Reports, you can find a lot more details about the malware
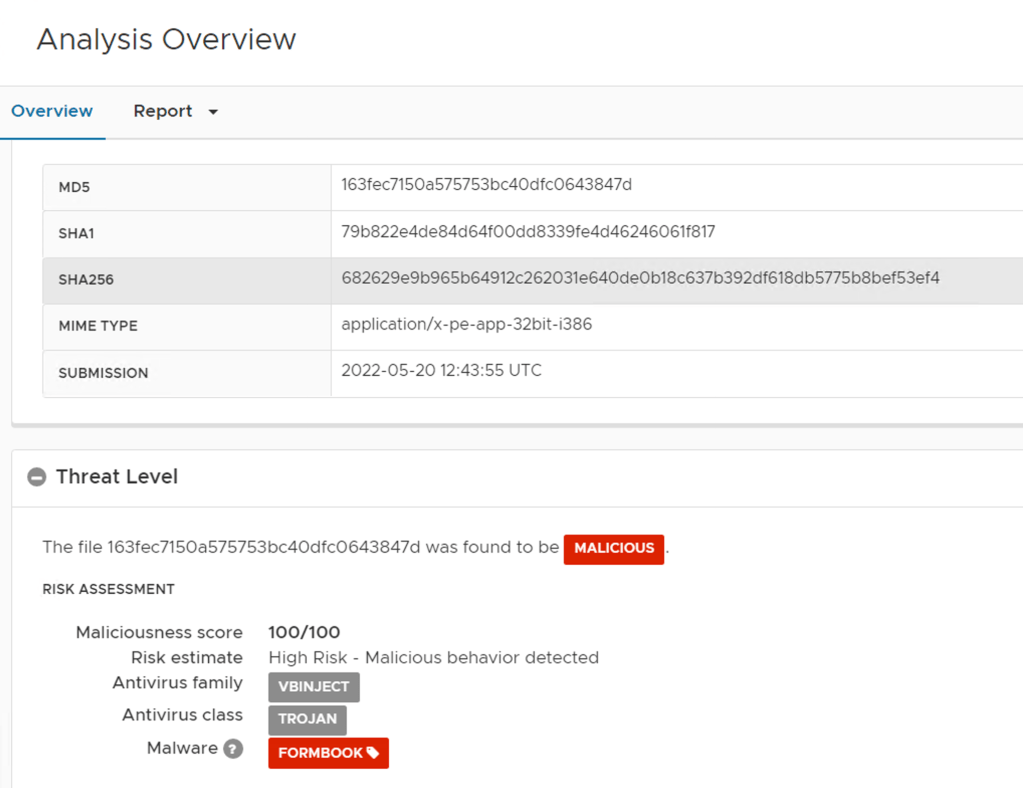
You can scroll down in the Overview for more details shown below
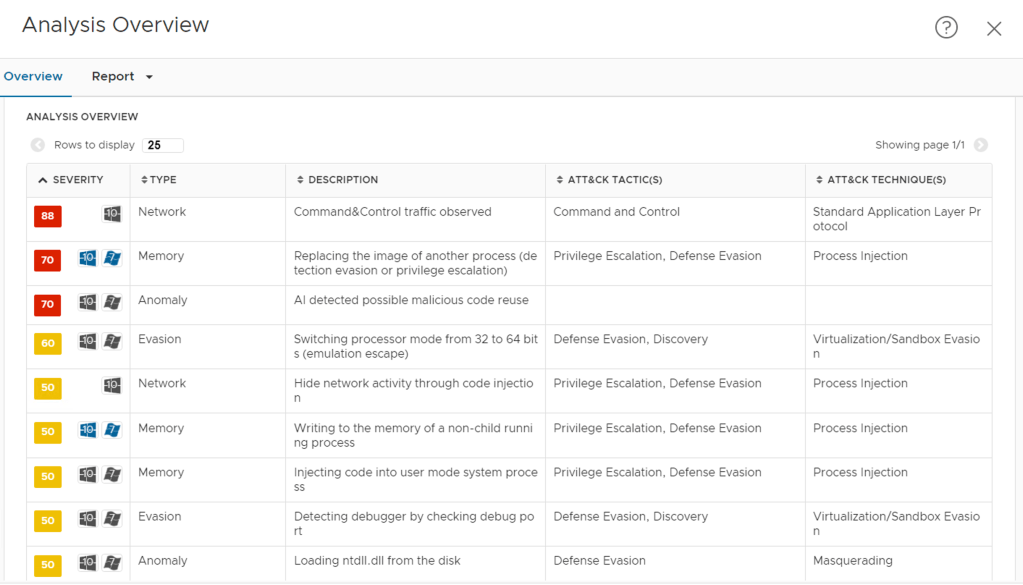
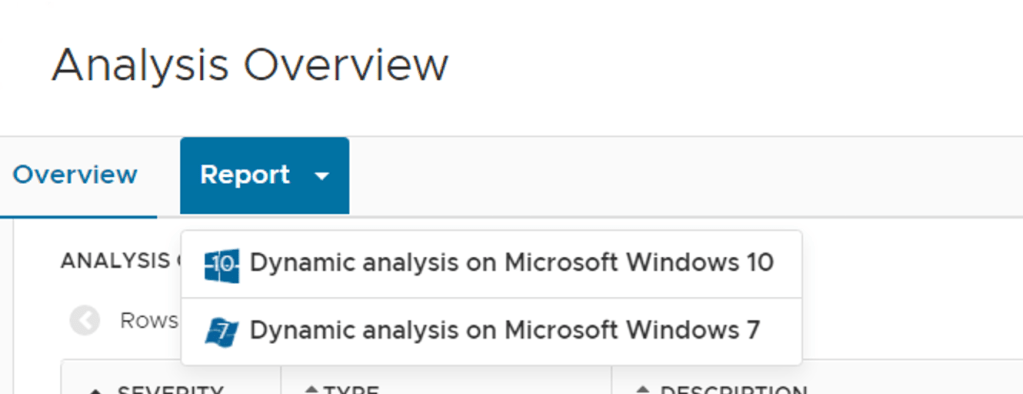
Or Click on Report and select the OS specific report
I selected Windows 10 and the report shows me how the malware would proceed from subject to subject
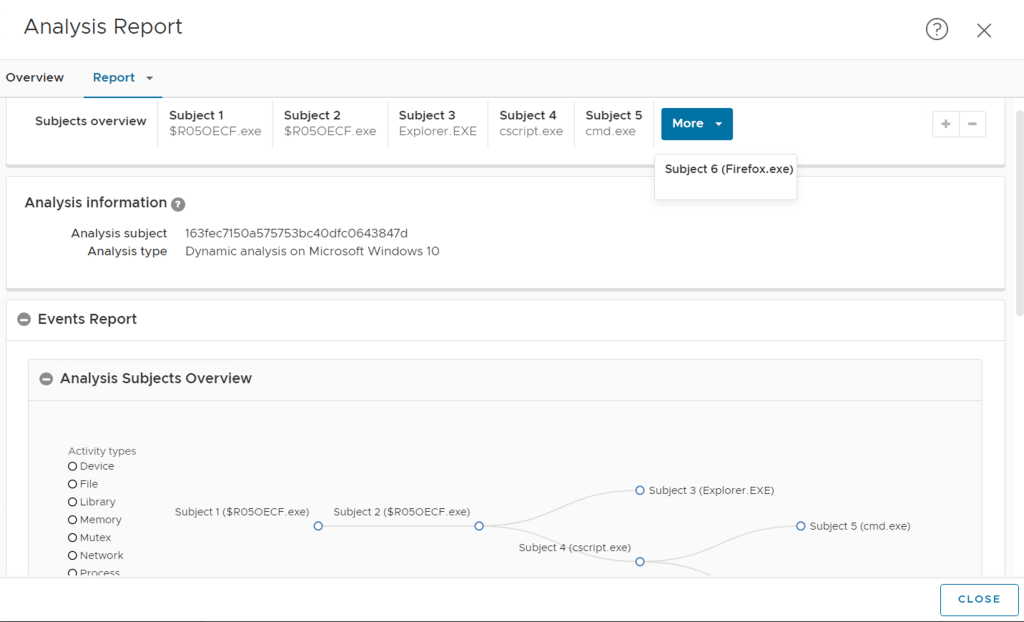
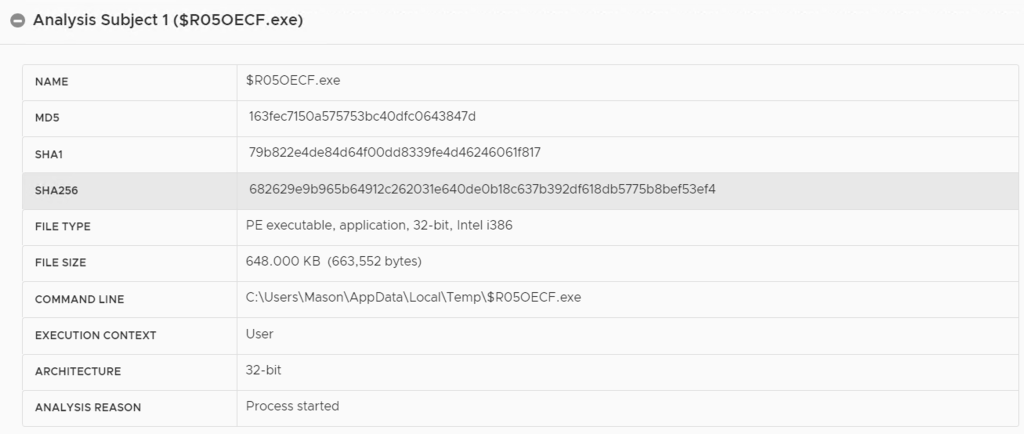
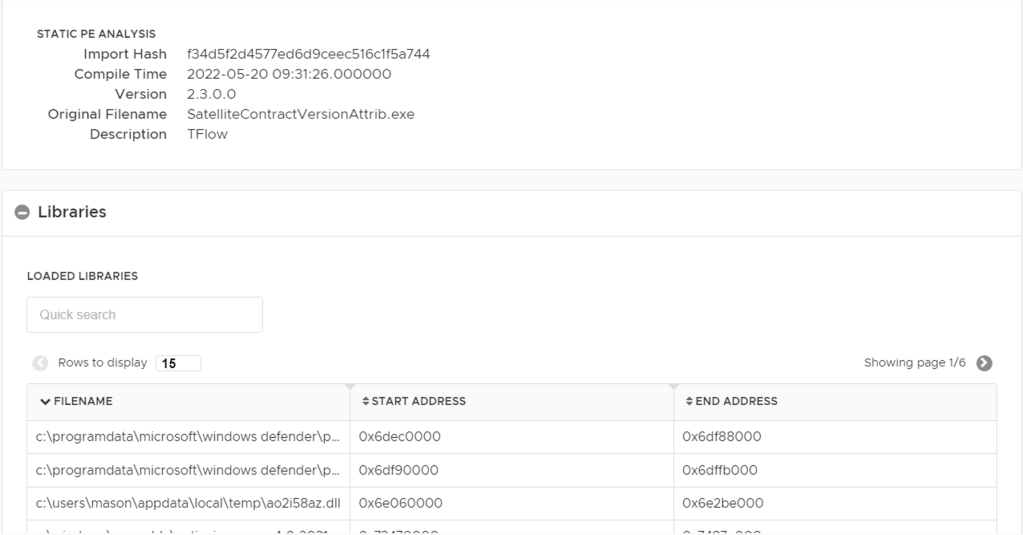
We can drill down to each Subject and see the details – I selected Subject 1

Normally I don’t learn post on blogs, but I would like to say that this write-up very pressured me to take a look at and do it! Your writing style has been surprised me. Thank you, quite nice post.
LikeLiked by 1 person